
Wild Salads are back in full swing!
Read moreElderberry Syrup: An Immune Booster
Elderberry Syrup Master Recipe Makes about 20 oz
Flavorful and sweet, elderberry syrup can be added to smoothies, herbal teas, mixed drinks, and fermented sodas, or diluted into hot water or cold sparkling water. For a visually appealing and tasty treat, drizzle this dark magenta syrup onto yogurt, ice cream, custard or cheesecake. It also tastes great spread on pancakes and waffles, or used as cookie fillings.
Elderberry syrup can also be taken straight by the tablespoonful for nutritional and therapeutic support. Elderberries are rich in iron and bioflavonoids, and are an immune system tonic. They are helpful in preventing infections such as colds and flus; however, if already infected, they help us move through the illness.
To help with proper identification and harvest, please see our illustration below.

Elderberry identification page from our Foraging & Feasting: A Field Guide and Wild Food Cookbook by Dina Falconi; illustrated by Wendy Hollender. Book link: http://bit.ly/1Auh44Q
Ingredients:
4 cups fully ripe elderberries, stems removed (weighs about 23 oz). When fresh elderberries are not available, I use frozen ones.
1½ cups maple syrup or honey (I prefer maple syrup as I usually don’t cook honey.)
Optional ingredients:
Add one or a combination of the following freshly ground, dried spices: 1 teaspoon aniseed, ¼ teaspoon ginger, ¼ teaspoon cinnamon, 1/8 teaspoon nutmeg, or 1/8 teaspoon cardamom
1 lime, zest and juice

Elderberries and maple syrup simmering on the stove.
Mix elderberry, sweetener and optional ingredients in a nonreactive 2–3 quart pot, cover, bring to a gentle simmer and cook for 5 minutes, stirring occasionally.
Remove lid from pot and gently simmer mixture for 5 more minutes.
Remove from heat and purée mixture with a hand-held immersion blender or food processor.
If you would like the syrup to be smooth and seed-free (which I recommended), strain it through a fine-mesh sieve.
Use right away. Or, to store, pour hot syrup into very clean glass jars, cap with tight fitting lids, label, leave out at room temperature to cool, then store in the refrigerator where they should keep for at least three months. For longer storage, freeze the syrup or seal in a hot-water bath.
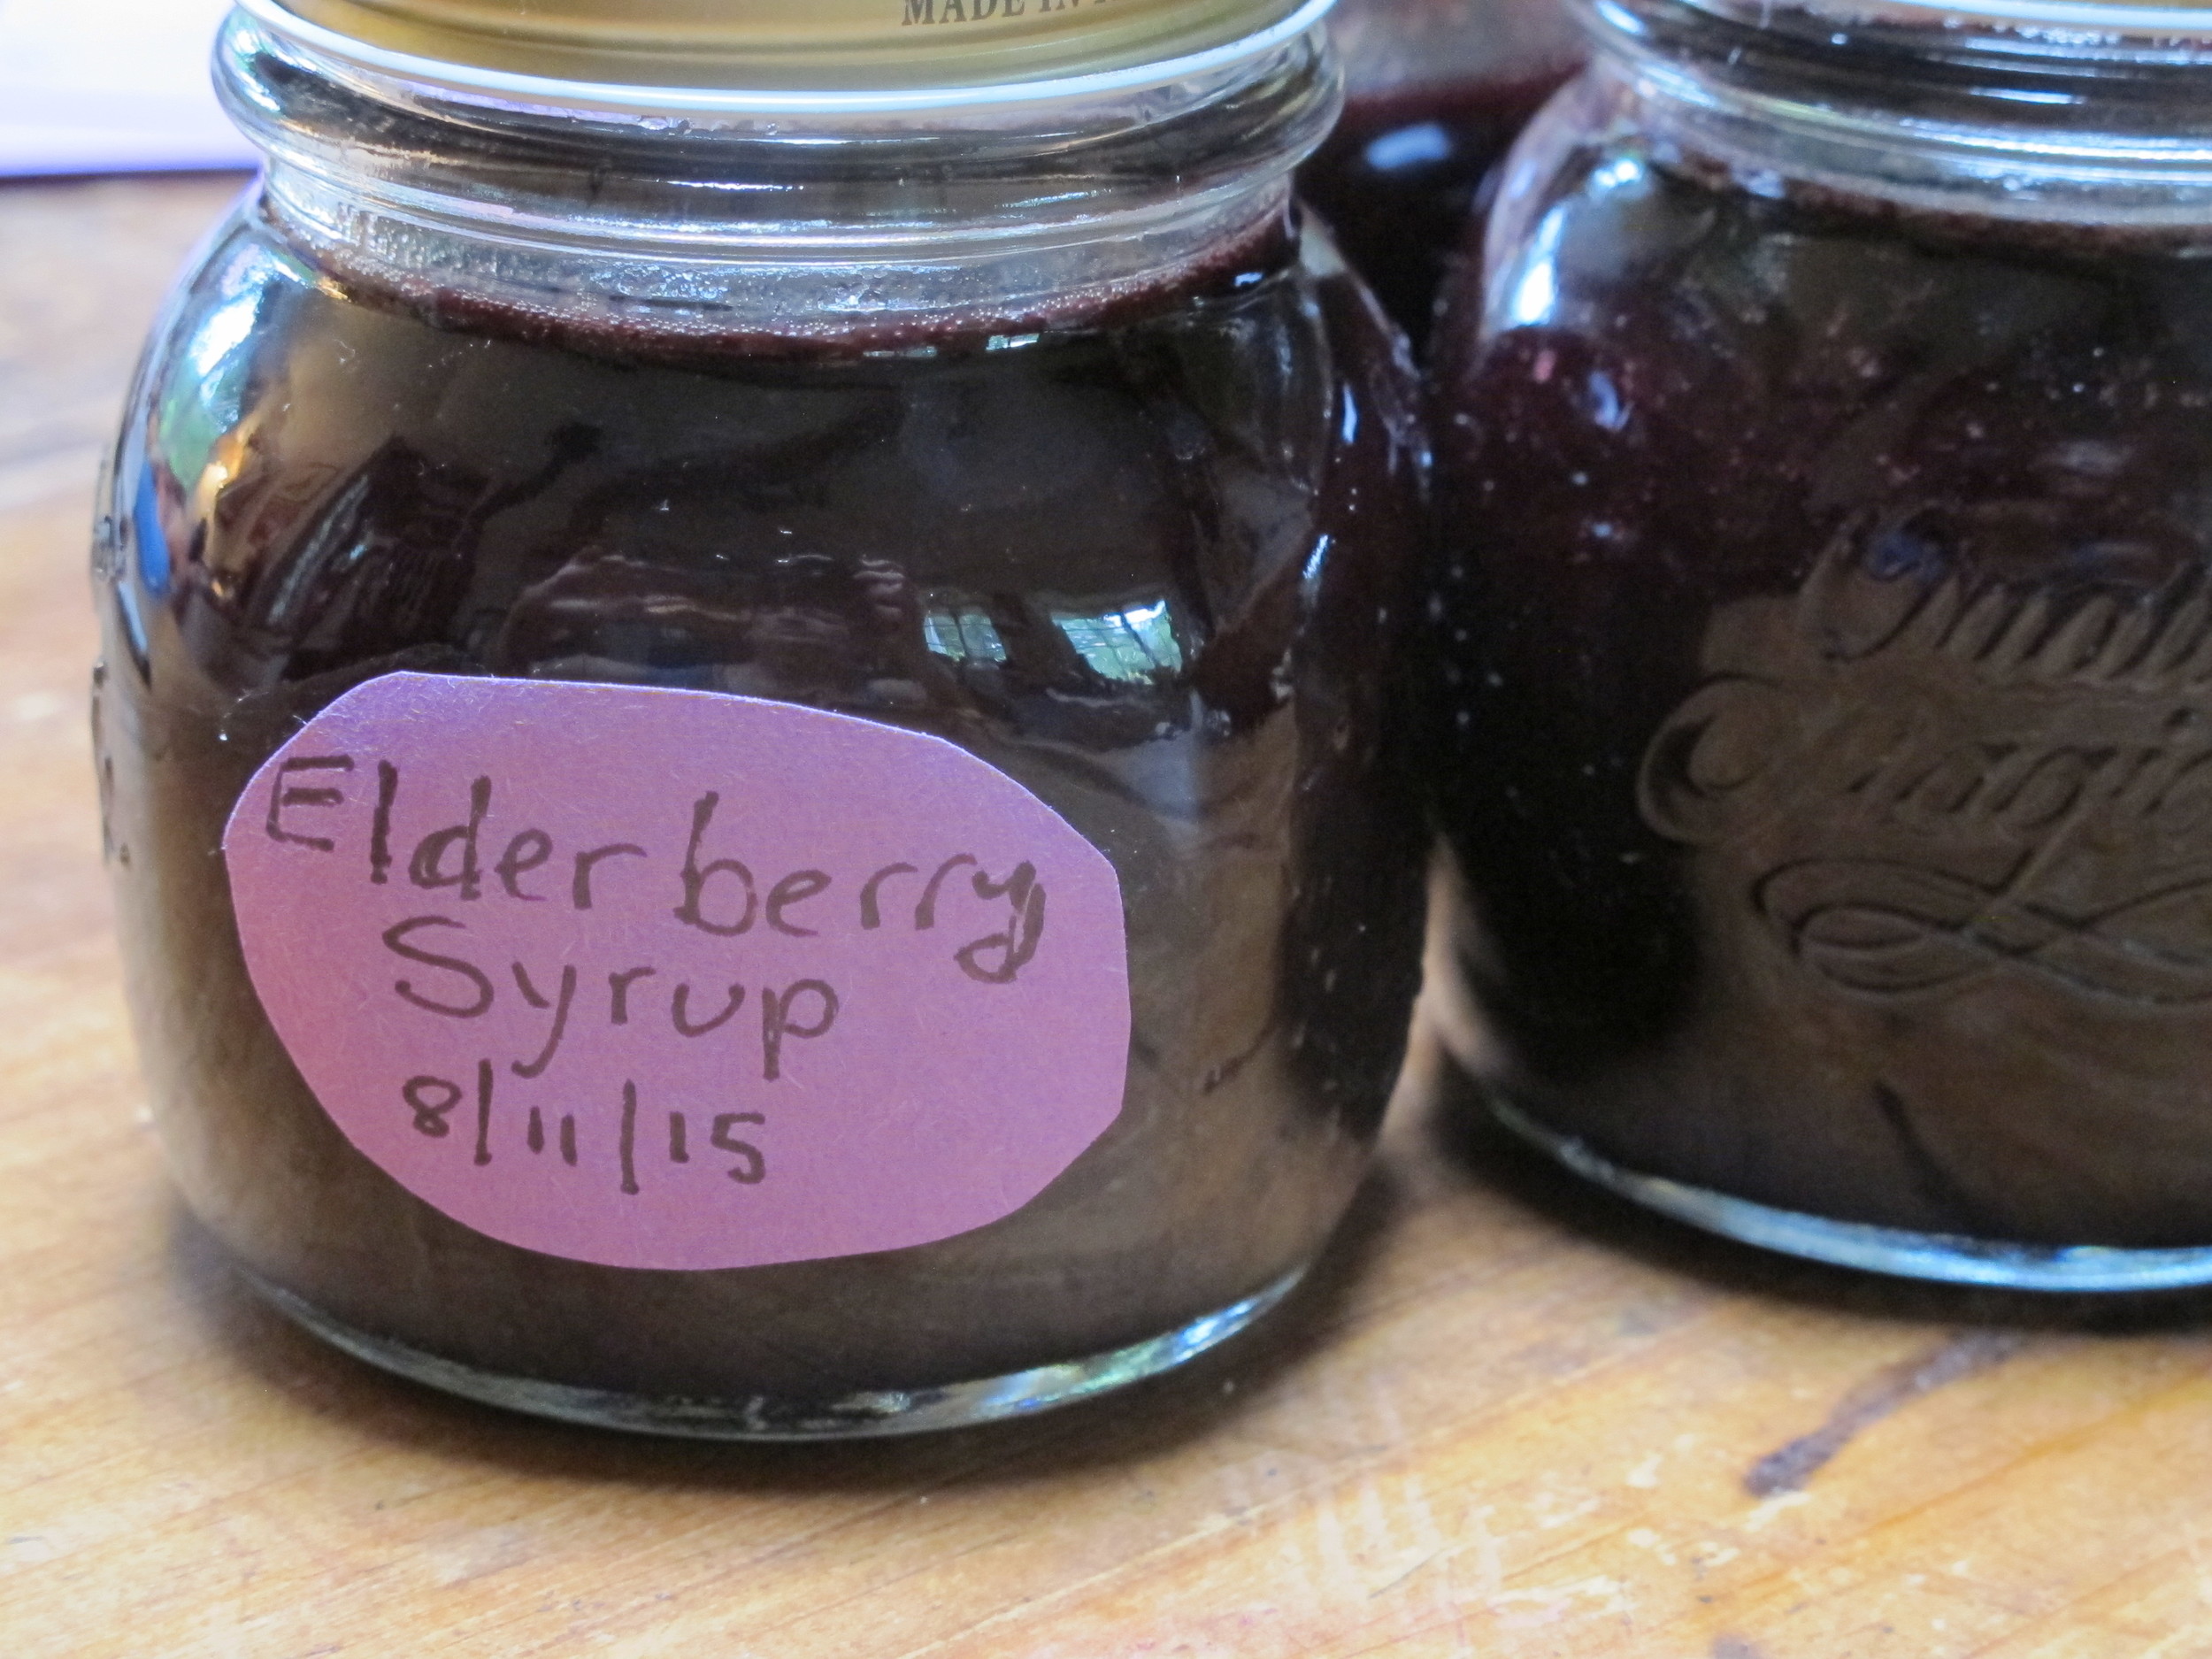
Elderberry syrup in jars.
Recipe excerpt from our Foraging & Feasting: A Field Guide and Wild Food Cookbook by (me) Dina Falconi; illustrated by Wendy Hollender. Book link: http://bit.ly/1Auh44Q
Marvelous Mint and What To Do With It!
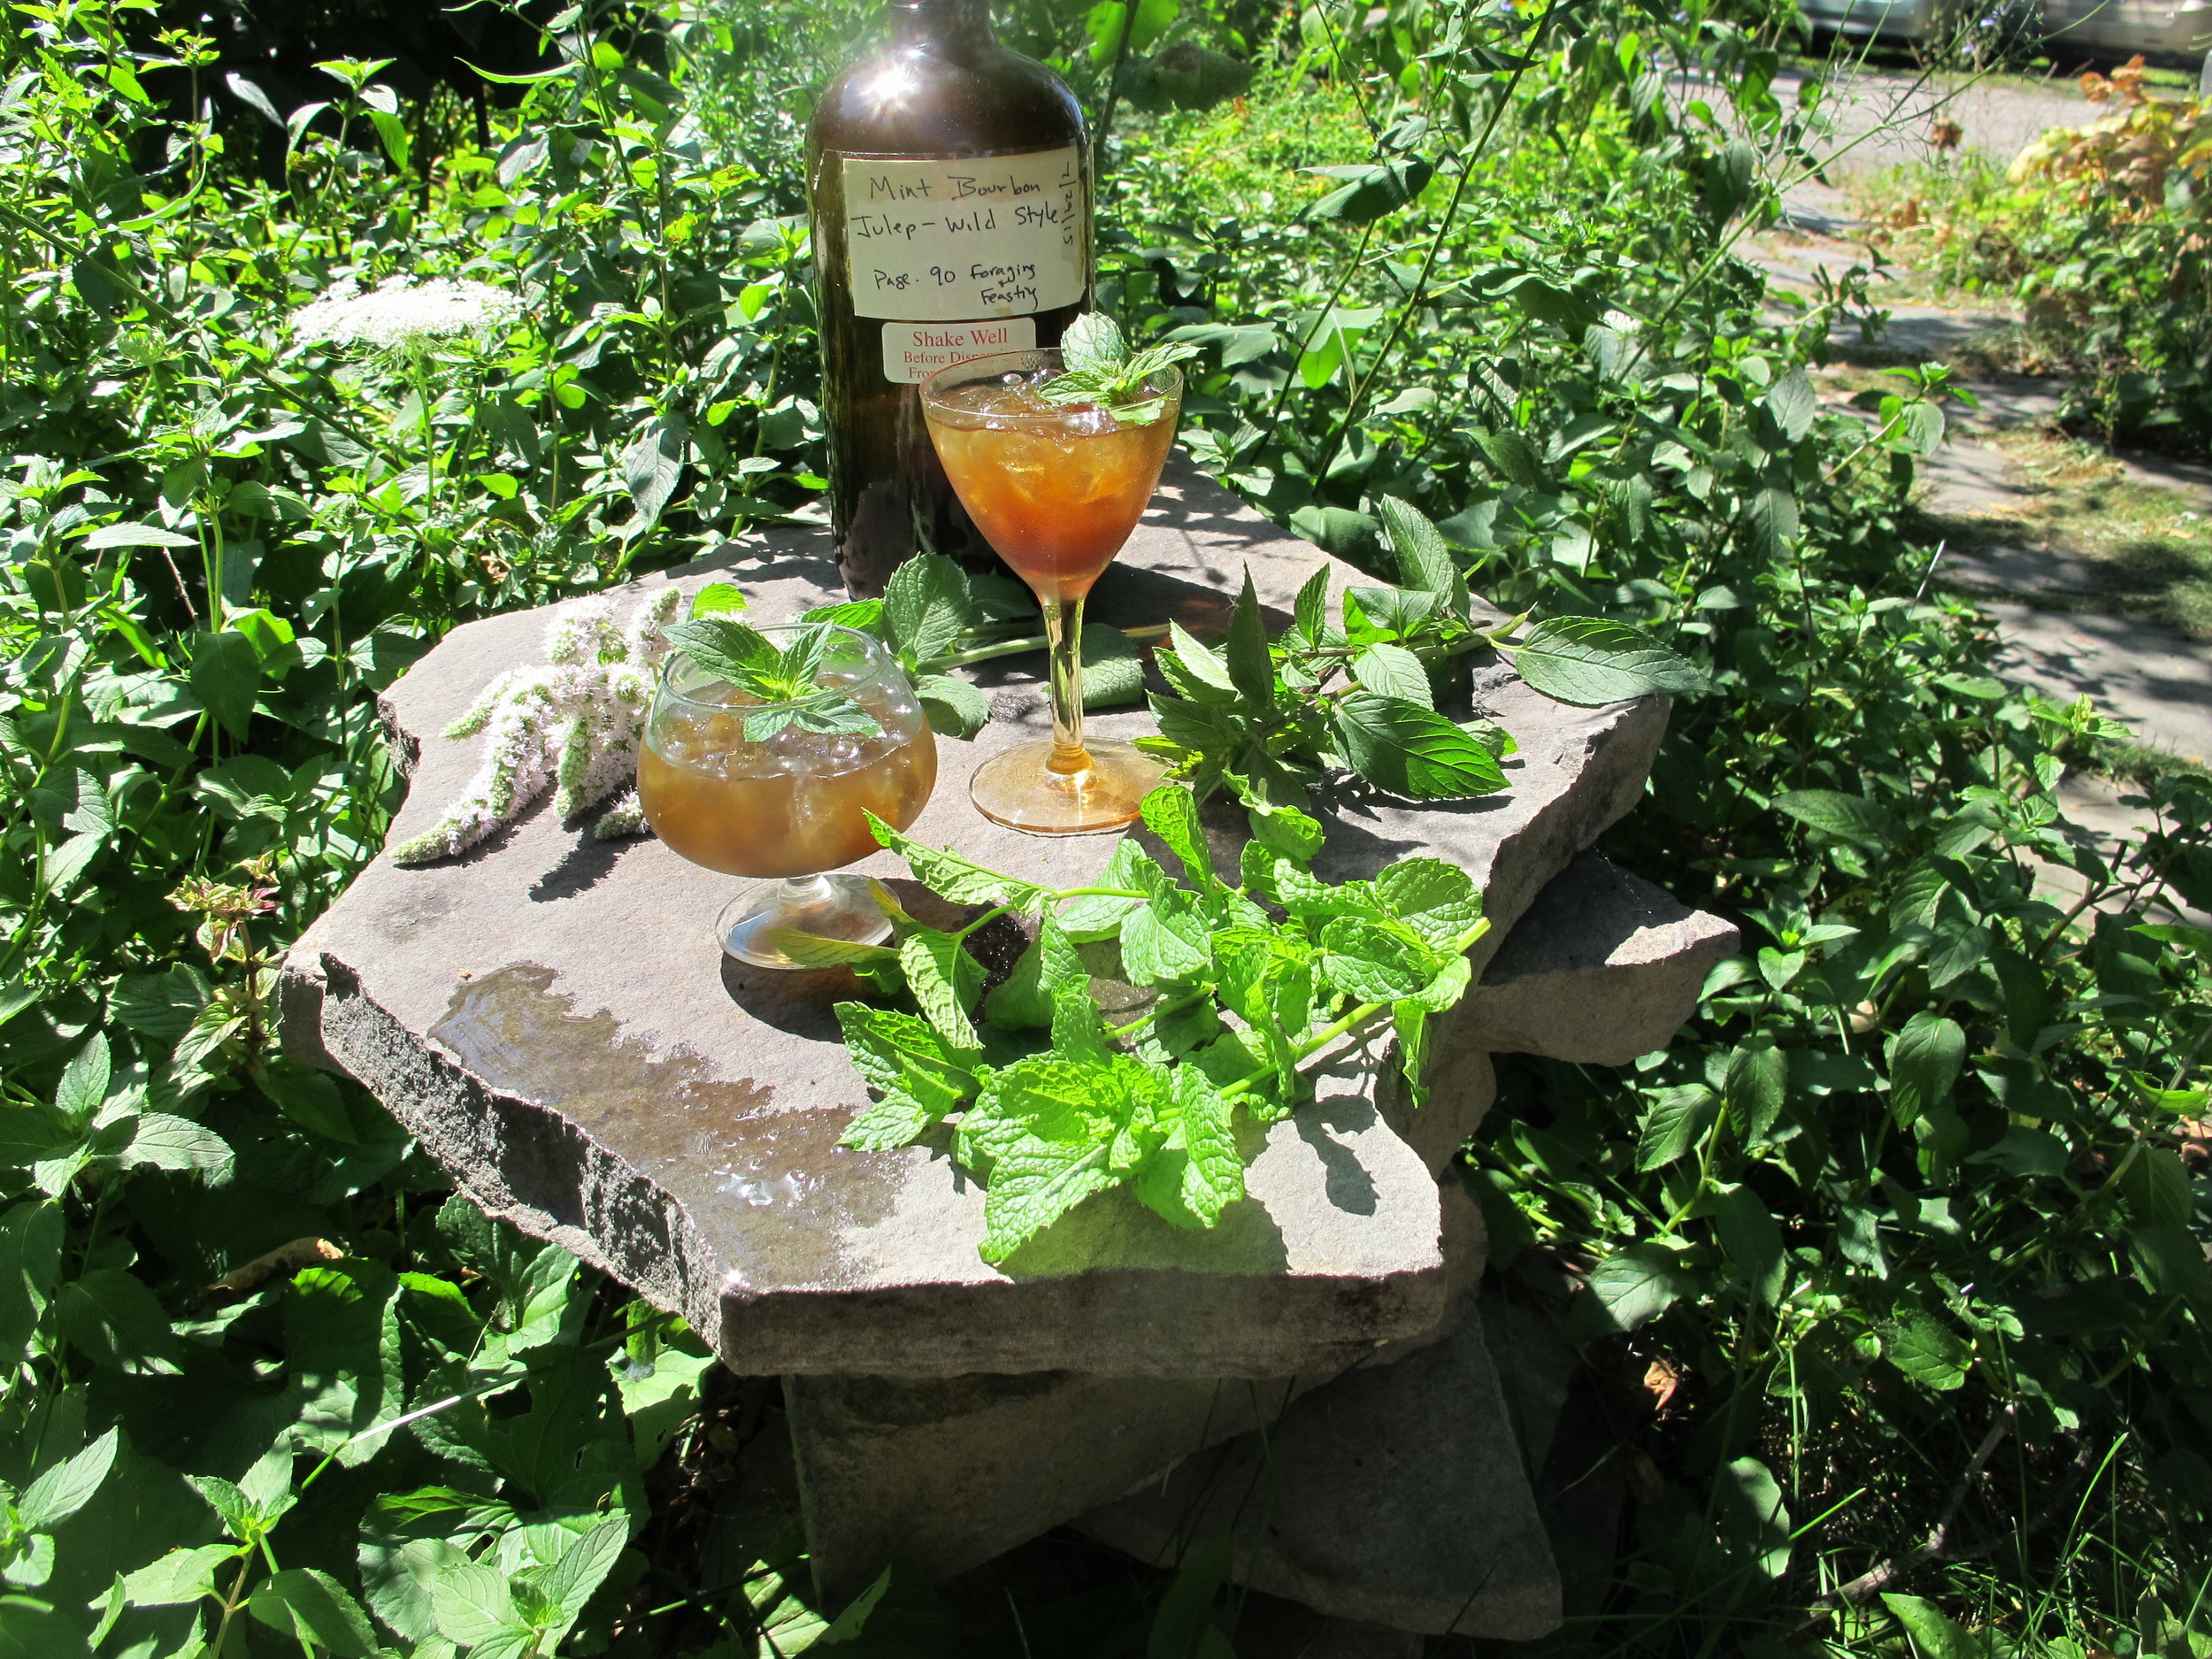
Here is a perfect craft cocktail that is cooling and refreshing for these late summer, fresh mint-filled days. If you are into Mint Juleps this version really heightens the mint flavor in a satisfying way.
Mint Bourbon–Julep Wild Style
Makes 16 oz, serves 4–6
This lightly sweetened liqueur captures the essence of fresh mint. To achieve good flavor, purée the plants, then steep the mixture for a bit of time. Serve at social gatherings, or pour them into attractive bottles and give them away as gifts. The alcohol content of this drink ranges from 25% when using 80 proof to 31% when using 100 proof.
• 10 oz 80–100 proof bourbon
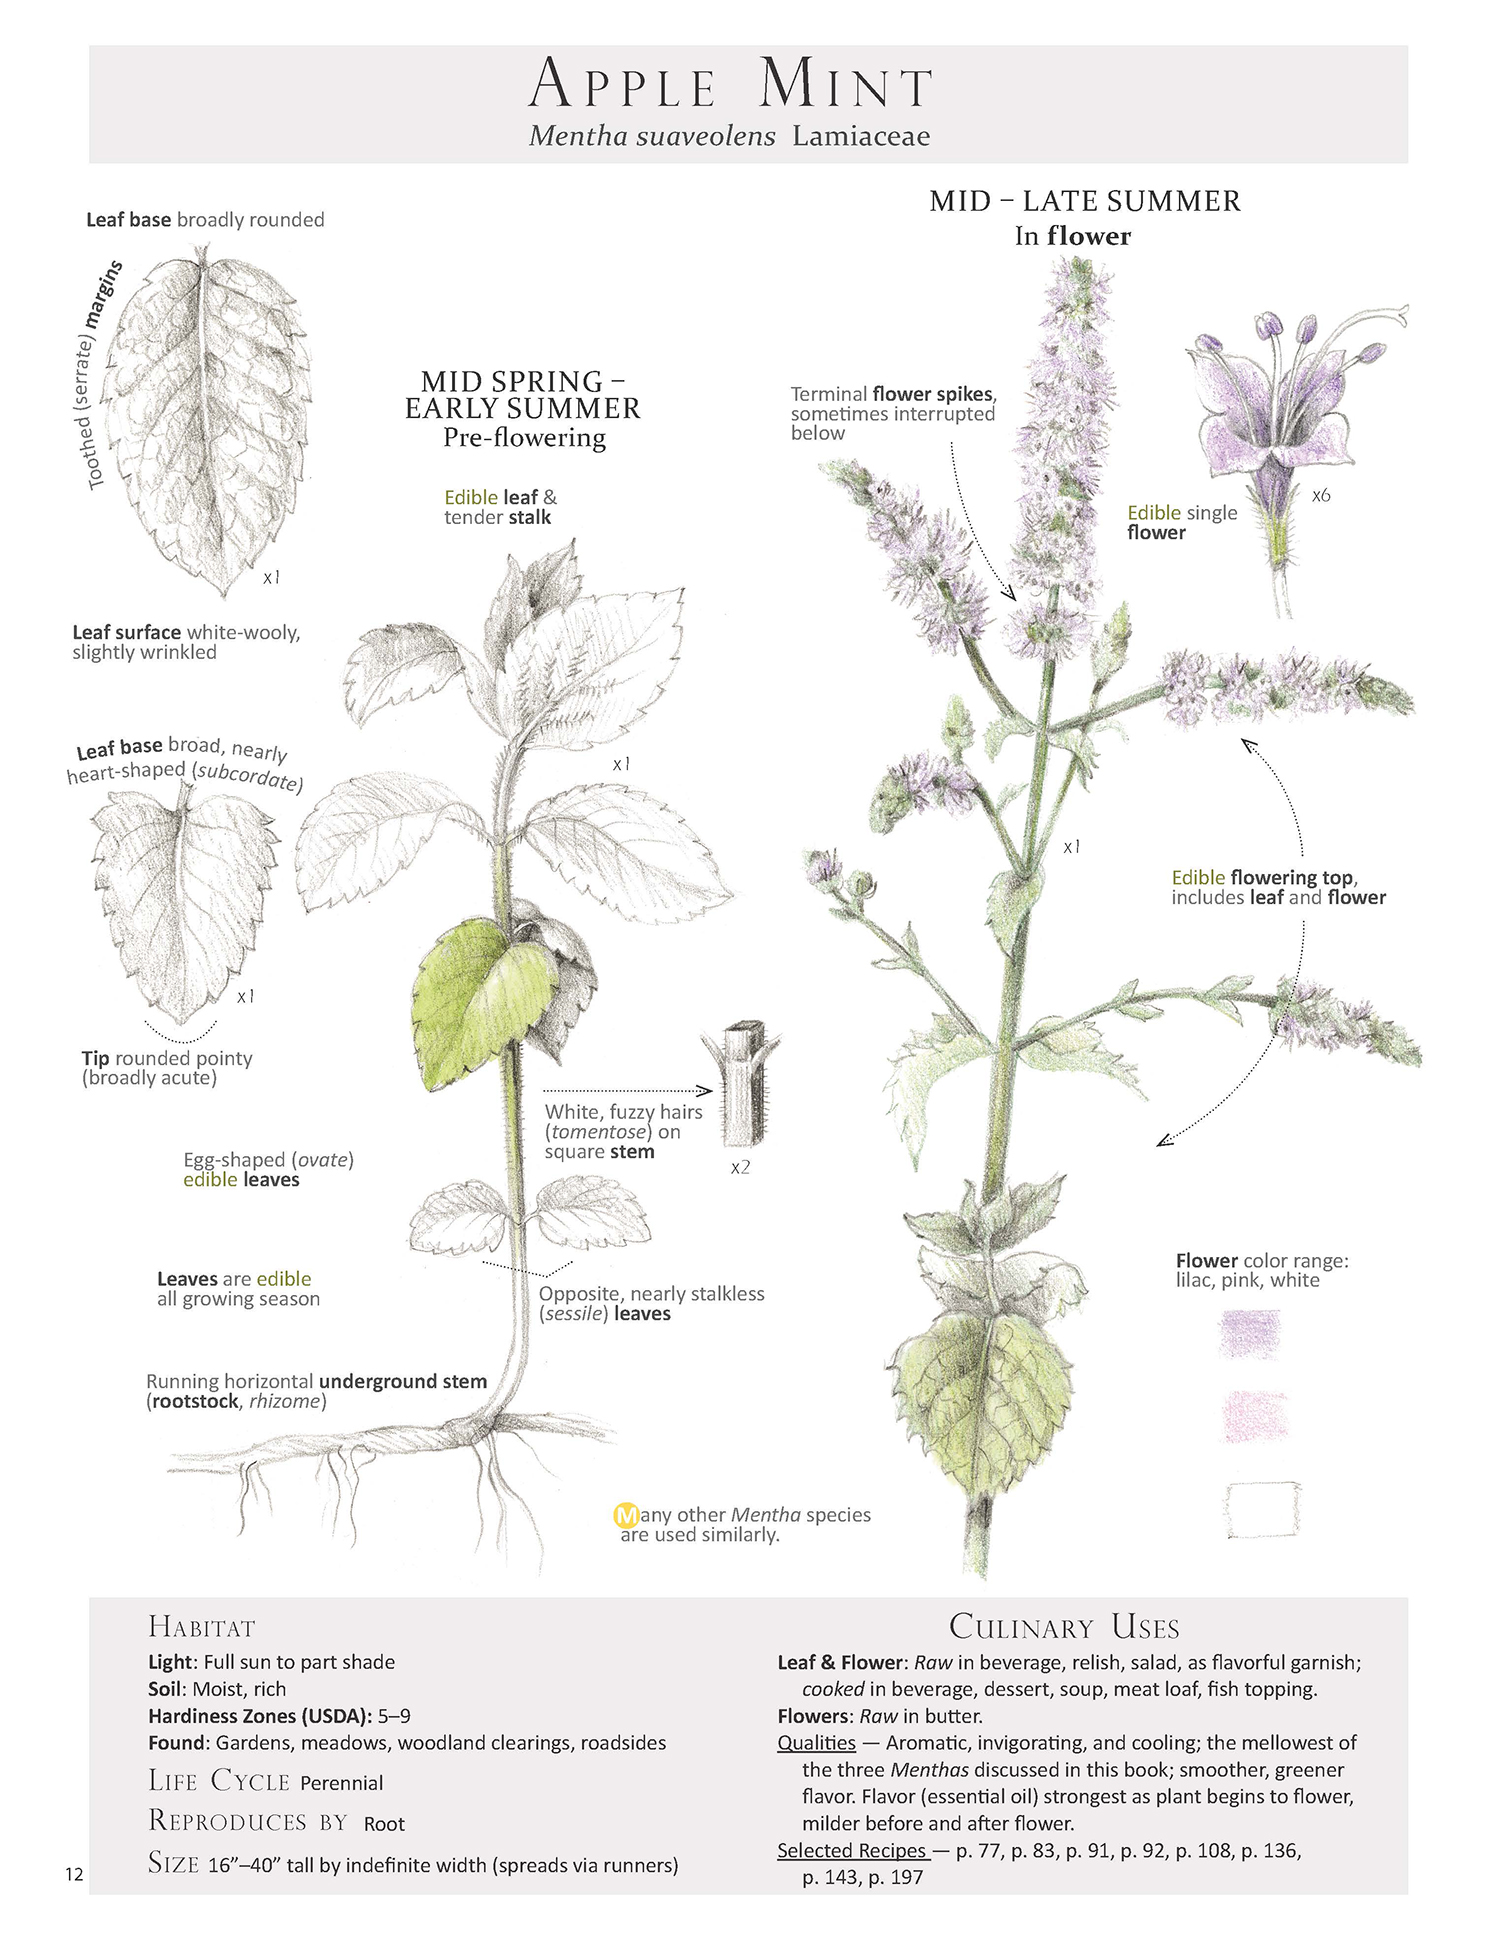
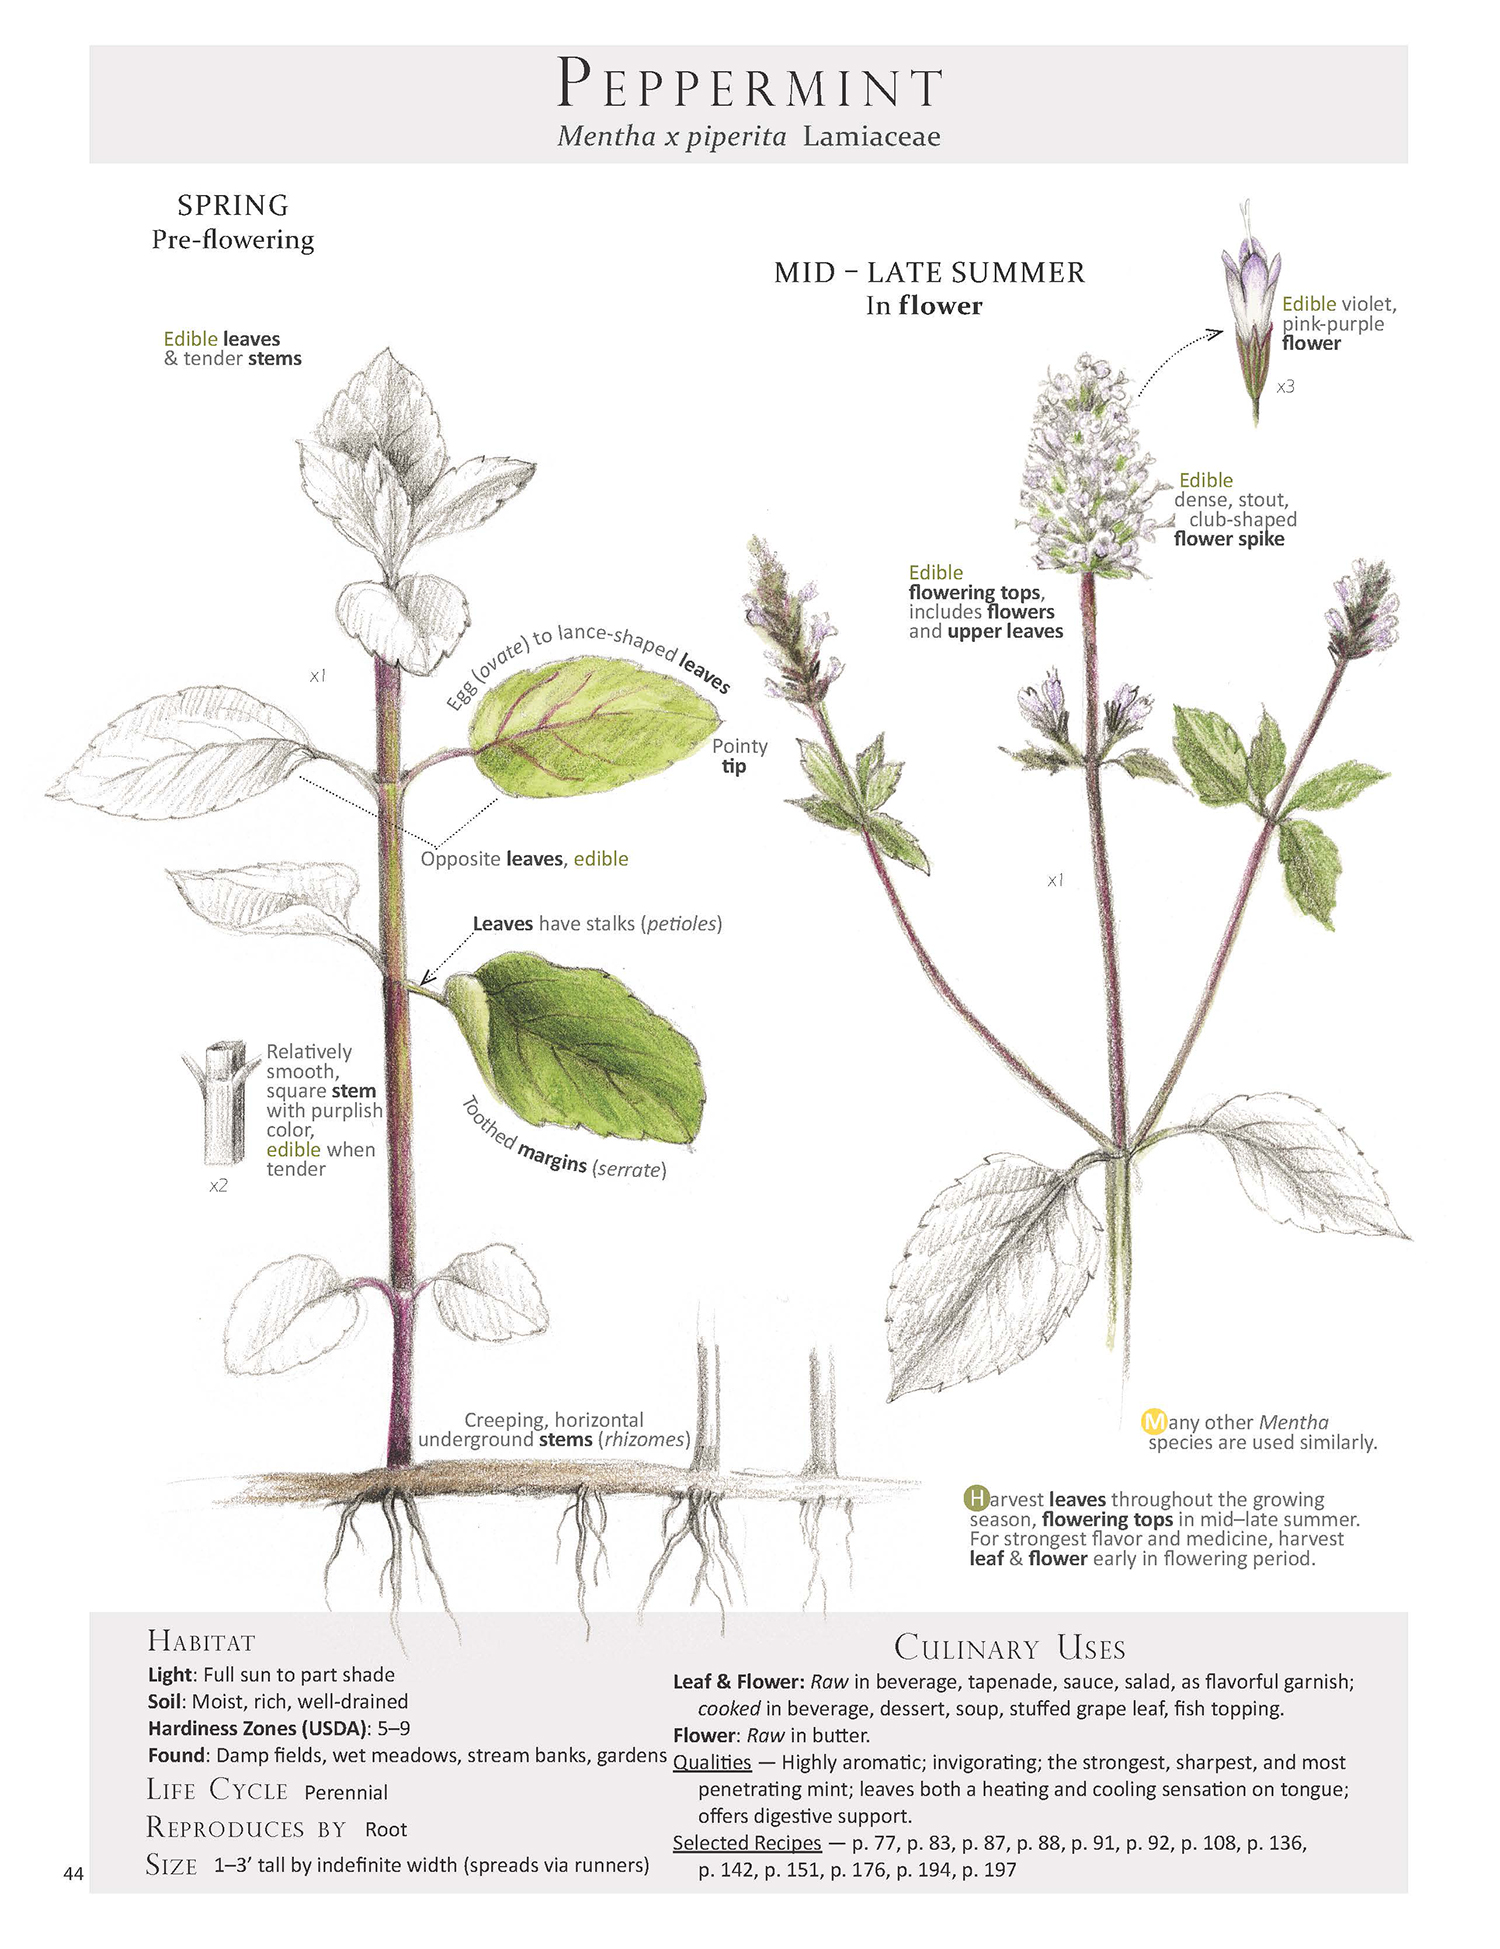
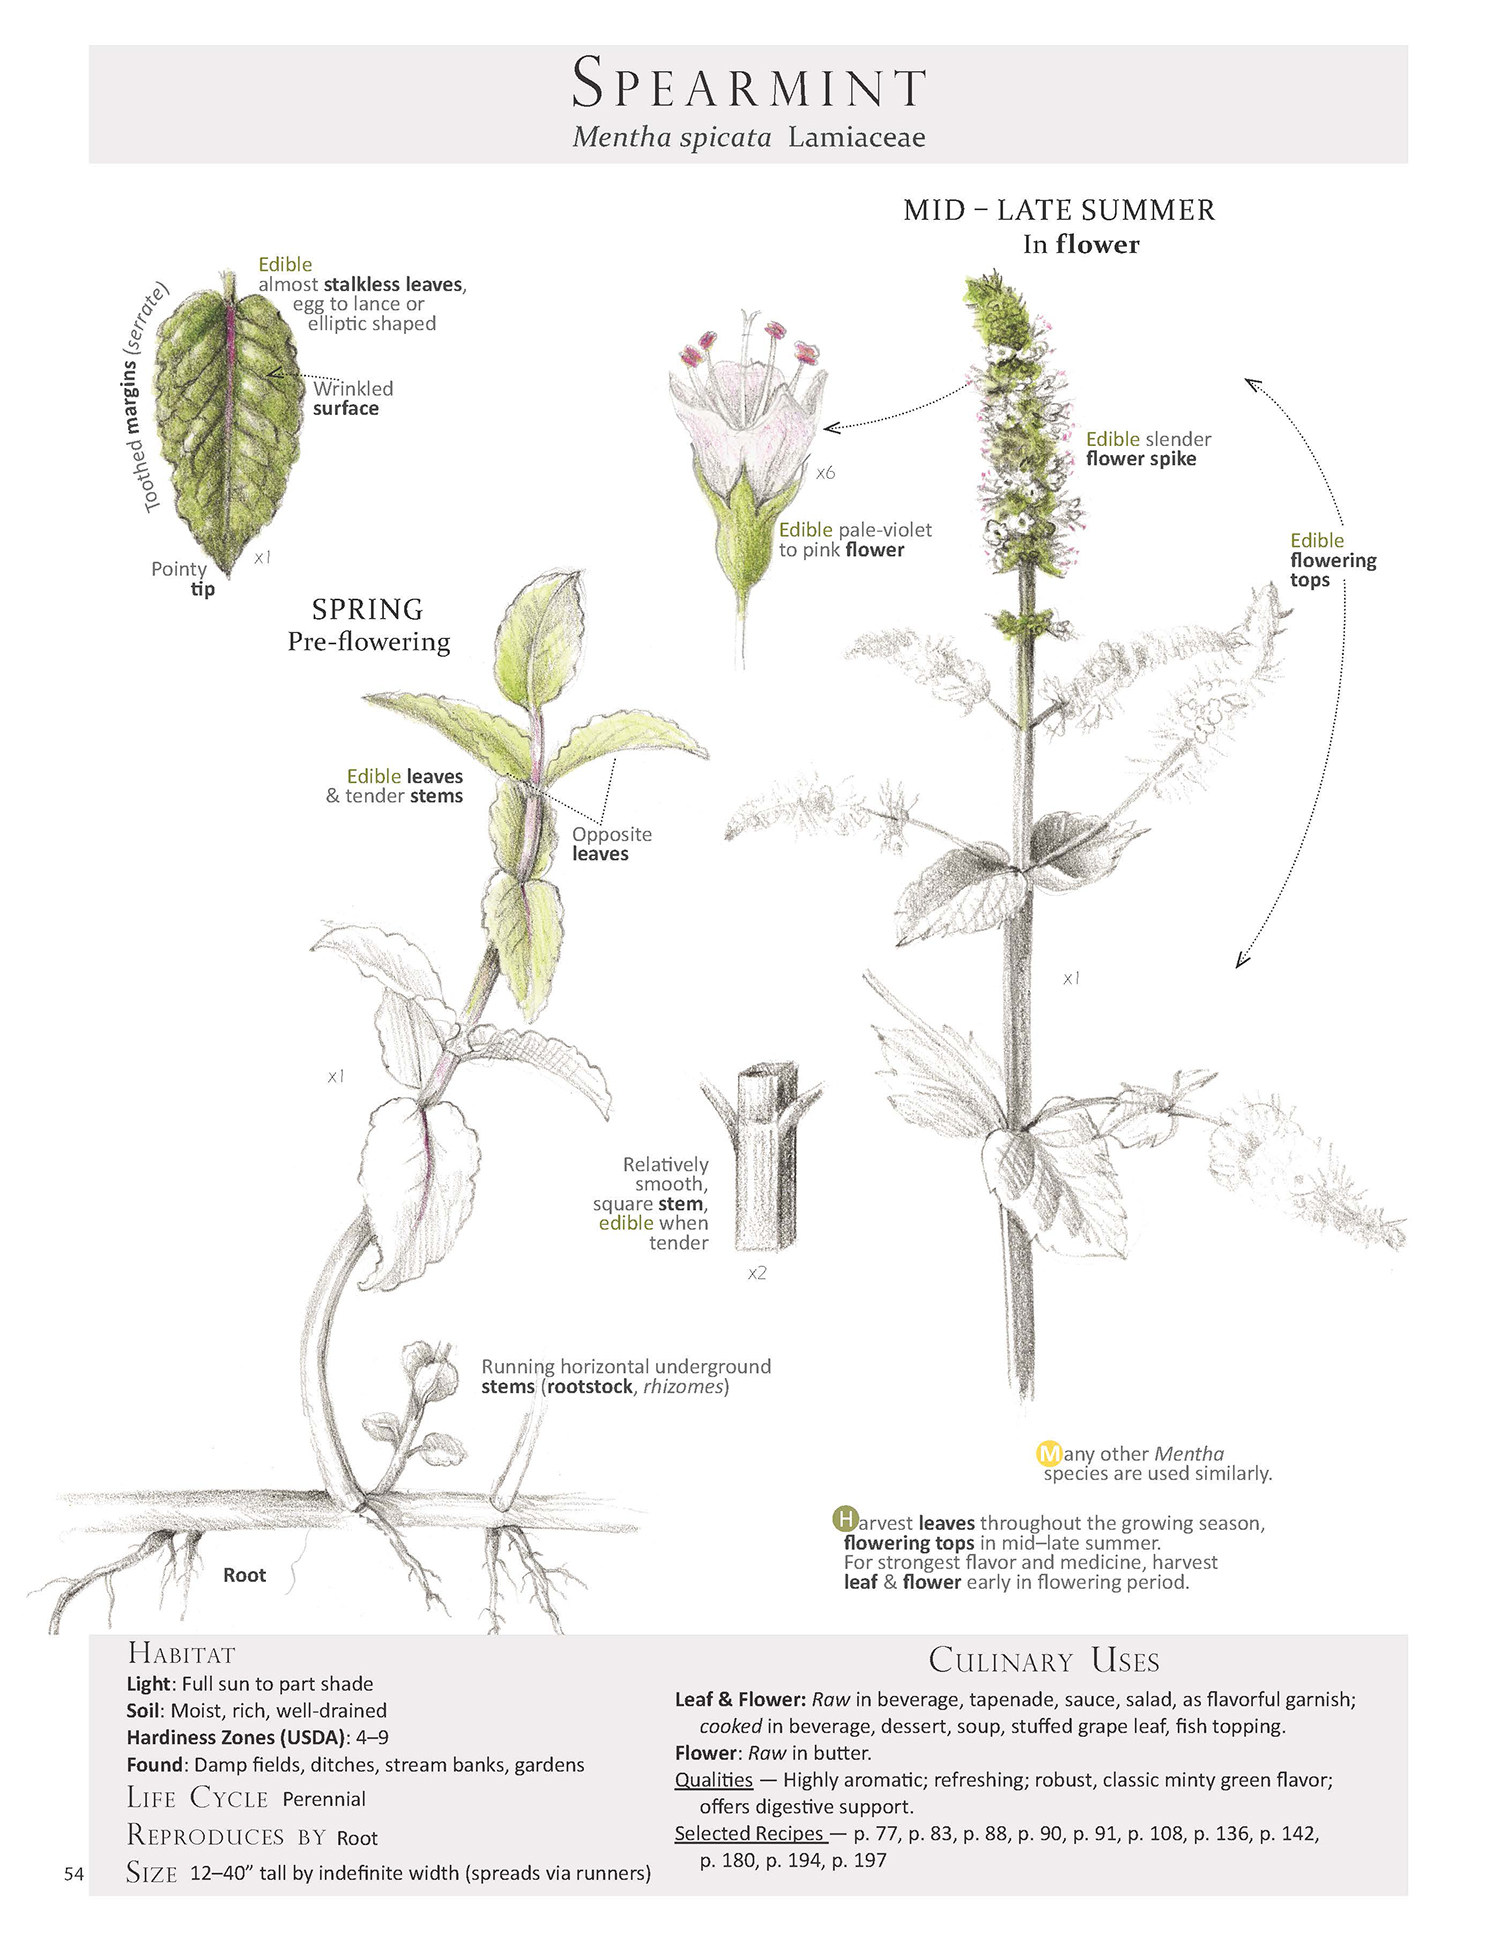
• 2 large handfuls fresh leaves or flowering tops of apple mint, peppermint, and spearmint (stripped off main stalk). I like this mint combo, but if you only have one kind of mint, by all means use it.
• 4 oz water
• 3–4 tablespoons maple syrup
Purée ingredients in a blender, pour into a glass jar, cover with a tight-fitting lid and leave out for about an hour, or for up to four weeks at room temperature. Strain through a fine-mesh sieve, and squeeze the plant material to remove as much liquid as possible. If you would like to remove all plant particles, line the sieve with a thin linen cloth before straining. Serve over crushed ice and garnish each glass with a fresh mint leaf, if available. To store, pour into a glass bottle, cap tightly and keep in a cool, dark place. This Mint Bourbon keeps for at least a year, and although it won’t rot due to the alcohol content, the aromatic flavors decrease with time.
Recipe excerpt and mint identification pages from our Foraging & Feasting: A Field Guide and Wild Food Cookbook by (me) Dina Falconi; illustrated by Wendy Hollender. Book link: http://bit.ly/1Auh44Q
Wild Green Pesto — Oh So Tasty: Or What To Do With All Those Weeds!
Wild Green Pesto — Oh So Tasty: Or What to Do With All Those Weeds!
Read moreAgua Frescas & Herbal Essence Waters = Refreshing Beverages of the Season

Peppermint Blackberry Agua Fresca
Agua Frescas Master Recipe Makes one quart
Agua Frescas, from my native Mexico, combine water, fruit, and sweetener to produce refreshing celebrations of the season. Using the least amount of sweetener allows the flavors of the fruits to burst forth. These drinks can be made with unprocessed fruit, as described below, or with Fruit Coulis as shown in the next master recipe.
- 2 cups fresh or frozen fruit (about 8–10 oz) cut into 2-inch pieces. Remove large pits and seeds or, if using berries or grapes, leave whole.
- 3 cups water
- 2–4 tablespoons sweetener (more or less to taste) such as raw honey, maple syrup or Sucanat
Blend the ingredients well, strain, chill if desired, and serve. It is best to drink Agua Frescas right after they are made, but they will keep, if covered in the refrigerator, for 2–3 days. If making ahead of time, re-blend or shake well just before serving.
Note: Straining the Agua Fresca is unnecessary if the fruit you are using has only a few small seeds and you enjoy drinking a more textured liquid.
Agua Frescas made with Fruit Coulis Master Recipe Makes one quart
Having Fruit Coulis on hand makes Agua Frescas easy to assemble.
1 cup Fruit Coulis, fresh or frozen (click here)
3 cups water
Blend Fruit Coulis with water and serve. If Fruit Coulis is frozen, let it partially thaw, then blend.
Fruitful Variations: Many different fruits can be used for making Agua Frescas. I love making them with wild and cultivated berries but I also enjoy making Agua Frescas with apricots, peaches, and pears. Using these basic recipes as a reference point, I am constantly experimenting and I encourage you to do the same.
Wild Black Raspberry Agua Fresca: This tart purple beverage is as pleasing to look at as it is to drink. Red raspberries work equally well.
Use 2 cups black raspberries and ¼ cup raw honey or 1 cup Black Raspberry Coulis and follow preceding Master Recipe.
Wild Blueberry Agua Fresca: A flavorful rich drink, full of antioxidants. Of course cultivated blueberries may be used.
Use 2 cups blueberries and ¼ cup maple syrup or 1 cup Blueberry Coulis and follow preceding Master Recipe.
Elderberry Agua Fresca: Elderberries, famous for immune boosting and blood building, can be made into this delightful drink that has a beautiful magenta color.
Use 2 cups fully ripe elderberries and ¼ cup maple syrup or 1 cup Elderberry Coulis and 1 tablespoon maple syrup and follow preceding Master Recipe.
American or European Black Currant Agua Fresca: Black currants, rich in bioflavonoids, iron and vitamin C, possess a pungent, earthy flavor. They contain little sugar, so adjust sweetener to taste.
Use 2 cups black currants and ¼ cup maple syrup or 1 cup Black Currant Coulis and 1 tablespoon maple syrup and follow preceding Master Recipe.
Peach Nectar Agua Fresca: When our peach trees start ripening, our kitchen is filled with baskets of peaches that need to be eaten or processed into something quickly. This drink is a great way to enjoy some of those peaches.
Use 2 cups peaches, cut into 2-inch pieces with pits removed, and ¼ cup maple syrup or 1 cup Peach Coulis and 1 tablespoon maple syrup and follow preceding Master Recipe.
Wild Grape Agua Fresca Full of autumnal essence, this deep, tangy drink is also very rich in health promoting antioxidants and nutrients.
Use 2 cups wild grapes or cultivated concord grapes and 2 tablespoons raw honey or 1 cup Wild grape Coulis and follow preceding Master Recipe.

Apple Mint Blueberry Agua Fresca
Herbal Flavoring Variations: For a fun and tasty treat, add herbal flavors to the Agua Frescas by doing the following:
- Use Herbal Essence Water (see below) instead of plain water.
- Puree 2 handfuls of fresh aromatic herbs, such as mint, lemon balm or anise hyssop, along with the other ingredients, and strain before serving.
- Place 2 handfuls of fresh aromatic herbs into the Agua Fresca after it has been blended. Cover the mixture and let the herbs steep in the Agua Fresca, at room temperature, for at least three hours before serving.
- Doing all of the above together produces the strongest herbal flavor.
Blackberry Mint Agua Fresca: An excellent refreshing drink that is cooling and tasty.
Use 2 cups blackberries and ¼ cup raw honey or 1 cup Blackberry Coulis, and 3 cups Mint Essence Water and follow preceding Master Recipe.
Raspberry Melissa Agua Fresca: Lemon balm, also known as Melissa, a wonderful uplifting herb that has a floral lemon-like flavor. It blends nicely with raspberry in this deliciously inspiring drink.
Use 2 cups raspberries and ¼ cup raw honey or 1 cup Raspberry Coulis, and 3 cups Lemon Balm Essence Water and follow preceding Master Recipe.
Blueberry Anise Hyssop Agua Fresca: A robust energizing drink full of antioxidants.
Use 2 cups blueberries and ¼ cup raw honey or 1 cup Blueberry Coulis, and 3 cups Anise Hyssop Essence Water and follow preceding Master Recipe.

Plant Identification page from Foraging & Feasting: A Field Guide and Wild Food Cookbook by Dina Falconi; illustrated by Wendy Hollender http://bit.ly/1Auh44Q
Herbal Essence Waters Master Recipe Makes about 3 cups
Herbal Essence Waters are subtle, refreshing drinks made with fresh aromatic herbs such as mint, lemon balm, and anise hyssop. No boiling or cooking is required — just time to let pure water absorb the essential oils from the plants. To produce the strongest flavor, harvest the herbs during the sunniest part of the day, between 10 am and 2 pm, when their essential-oil content is at its peak.
A quart vessel, preferably a glass jar with a tight- fitting lid
2 handfuls freshly harvested aromatic herb of choice
About 3¾ cups water, enough to cover the herbs and fill the jar
Place herb in quart jar, pour in water, cap jar, and let steep at room temperature for two to eight hours (any longer than eight hours and the herbs may begin to rot, detected by a funky odor.) You may also solar-infuse the liquid by placing the jar in the sun while steeping. When ready, serve the Herbal Essence Water right from the jar by pouring off the water. Or you can strain it, making sure to squeeze out all the water from the plant material. Serve chilled if desired. Store covered in the refrigerator and use within a couple of days.
Variations:
Mint Essence Water: Invigorating mint water is an herb class favorite.
Use 2 handfuls total of spearmint, peppermint, apple mint, mountain mint, or any other aromatic mint in the Mentha or Pycnanthemum genus and follow preceding Master Recipe.
Lemon Balm Water: Lemon balm, an uplifting and soothing herb, makes a subtle, lemon-like flavored drink.
Use 2 handfuls of lemon balm and follow preceding Master Recipe.
Anise Hyssop Water: Sweet, with an anise flavor, anise hyssop is as enjoyable to drink as it is to view in the landscape.
Use 2 handfuls of anise hyssop and follow preceding Master Recipe.

Plant Identification page from Foraging & Feasting: A Field Guide and Wild Food Cookbook by Dina Falconi; illustrated by Wendy Hollender http://bit.ly/1Auh44Q
Garlic Mustard Root = Wild-Style Horseradish
Garlic Mustard Root = Wild-Style Horseradish
Read moreCoconut & Chocolate Ganache
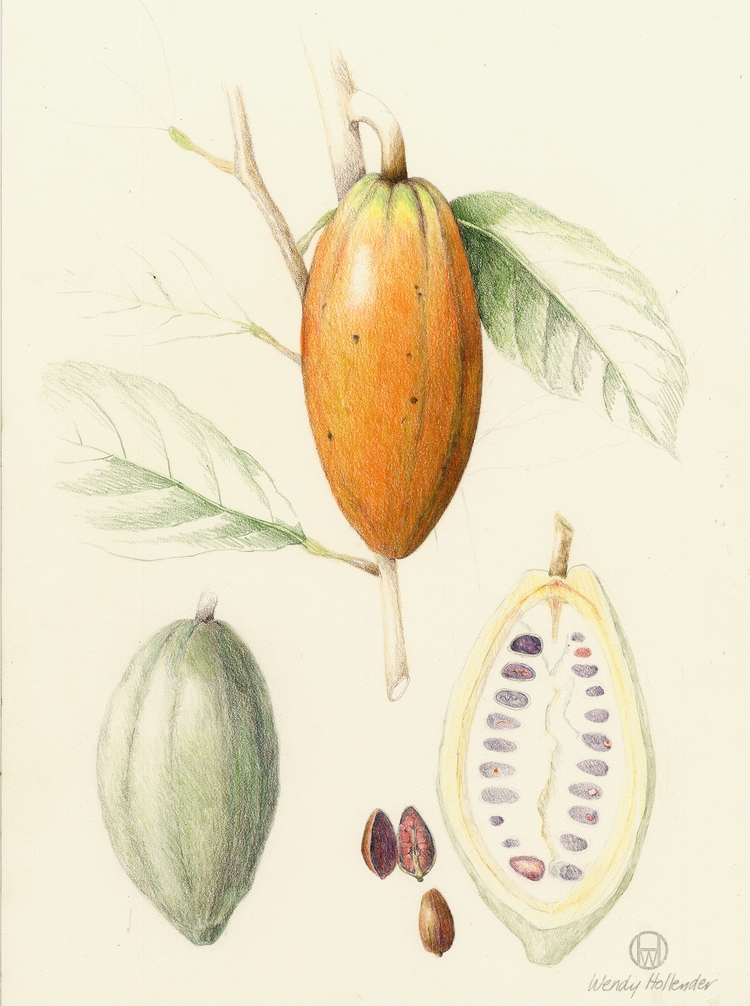
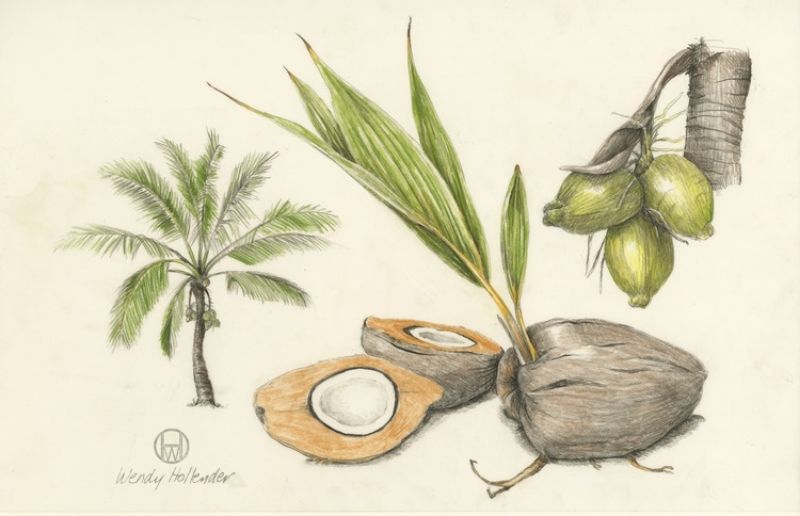
Coconut & chocolate ganache master recipe from Foraging & Feasting.
Read moreWild Grape Leaves: Harvesting & Stuffing
There's an exciting bounty to be had in turning wild grape leaves into delicious, nutritious food. Typically used for wrapping around savory rice fillings, with or without ground meat, grape leaves can also be wrapped around other foods such as fish, meatloaf, and more. In our area we are lucky to have an abundance of wild grape vines that appreciate pruning, and in return they reward us with a substantial supply of leaves. Cultivated grapes grown without chemicals provide another great source for leaves; perhaps a grape grower in your area will kindly share some leaves from mid spring through early summer pruning (usually they throw these away). Cook them up fresh and preserve some by marinating, dry canning, freezing, or lacto-fermenting so you can enjoy them throughout the year. You'll find detailed instructions below.
Grape leaves fall into the category of “wrap cookery,” along with cabbage, lettuce, spinach, and other wild leaves. Essentially any leaf that is tasty and tender yet strong enough to wrap around food falls into this category.
Harvesting Tips for Grape Leaves
- The best time to harvest grape leaves is from mid spring through early summer, when leaves are not too tough and leathery but large enough to effectively wrap around food.
- Look for newer leaves that are lighter green and tender, found towards the tip of the vine.
- The best size leaf to harvest is about the size of an average lady’s open hand, roughly measuring 5–6 inches wide; any smaller and they are too difficult to stuff; any larger and they tend to be too tough for eating. Also, choose intact leaves, minimizing ones with bug damage.
- Remove the leaf stem completely or it can puncture the leaf when rolling or while in storage.
- Store fresh grapes leaves as you would other leafy greens, such as kale or lettuce, by putting them into a plastic bag placed in the refrigerator, where they will keep for at least two weeks.
- 1 lb of fresh grape leaves, appropriate for stuffing, equals approximately 200–225 leaves.]

Wild Grape Leaf page from our book Foraging & Feasting: A Field Guide and Wild Food Cookbook by Dina Falconi; illustrated by Wendy Hollender
How to Stuff Grape Leaves
1. Spread grape leaf flat on a plate, unfolding any wrinkles. Face shiny side (the upper side of the leaf) down, with the stem remnant (leaf base) closest to you, and leaf tip pointing away from you. When using frozen or dry canned leaves, sprinkle them with a little water if they seem dry and brittle.
2. Place stuffing onto the lower center of the leaf, about an inch away from the leaf base.
· If using a raw grain stuffing, use a heaping teaspoon per leaf.
· If using a raw grain and meat stuffing, use a heaping teaspoon per leaf.
· If using a raw meat stuffing, use a heaping tablespoon per leaf.
· If using a cooked stuffing, use a heaping tablespoon per leaf.
3. Fold the leaf base (the edge closest to you) up over the stuffing and then fold the leaf sides toward the center, encasing the stuffing. Continue to roll toward the leaf tip, tucking the leaf sides into the center as you turn, rolling until the leaf tip is incorporated into the final cylindrical shape.
4. Stuffed grape leaves made with marinated leaves and a precooked filling may be eaten right away; ones made with raw filling and leaves need to be cooked and should be placed seam-side down in the cooking vessel to prevent them from unraveling.

Spread out on the plate is a marinated leaf I picked and preserved in spring. It awaits a precooked filling. Below is the jar the leaf was pulled out of. I placed a 100 or so grape leaves in this wide-mouth pint mason jar and covered them with a marinade made of olive oil, vinegar, and sea salt. FYI, leaves were first blanched before marinating. The jar, tightly covered, was kept in my refrigerator. I can't say for how long since I forgot to label the jar. Was it last spring or two springs ago? Note to self: label all concoctions. In any case the leaves are still in excellent condition and ready to be filled.

To stuff marinated grape leaves, choose a precooked stuffing such as the Grain Salads (p. 136), Grain Pilaf Variations (p. 138), or Bean Salads (p. 139). Naturally, part of the fun is to experiment and invent fillings to suit your fancy. Fill each grape leaf with a heaping tablespoon of stuffing and, if needed, refer to How to Stuff Grape Leaves above. Note: 3 cups of cooked stuffing fills about 32 grape leaves. The stuffing I made yesterday (pictured in the photo below) is a winter variation made with brown rice (soaked and cooked), parsley, almonds (soaked, dried, and lightly roasted), raisins, scallions, dried peppermint, olive oil, vinegar, sea salt and pepper.


Grape leaf with a heaping tablespoon of filling placed onto the lower center of the leaf, about an inch away from the leaf base, ready to be rolled.

All rolled up!
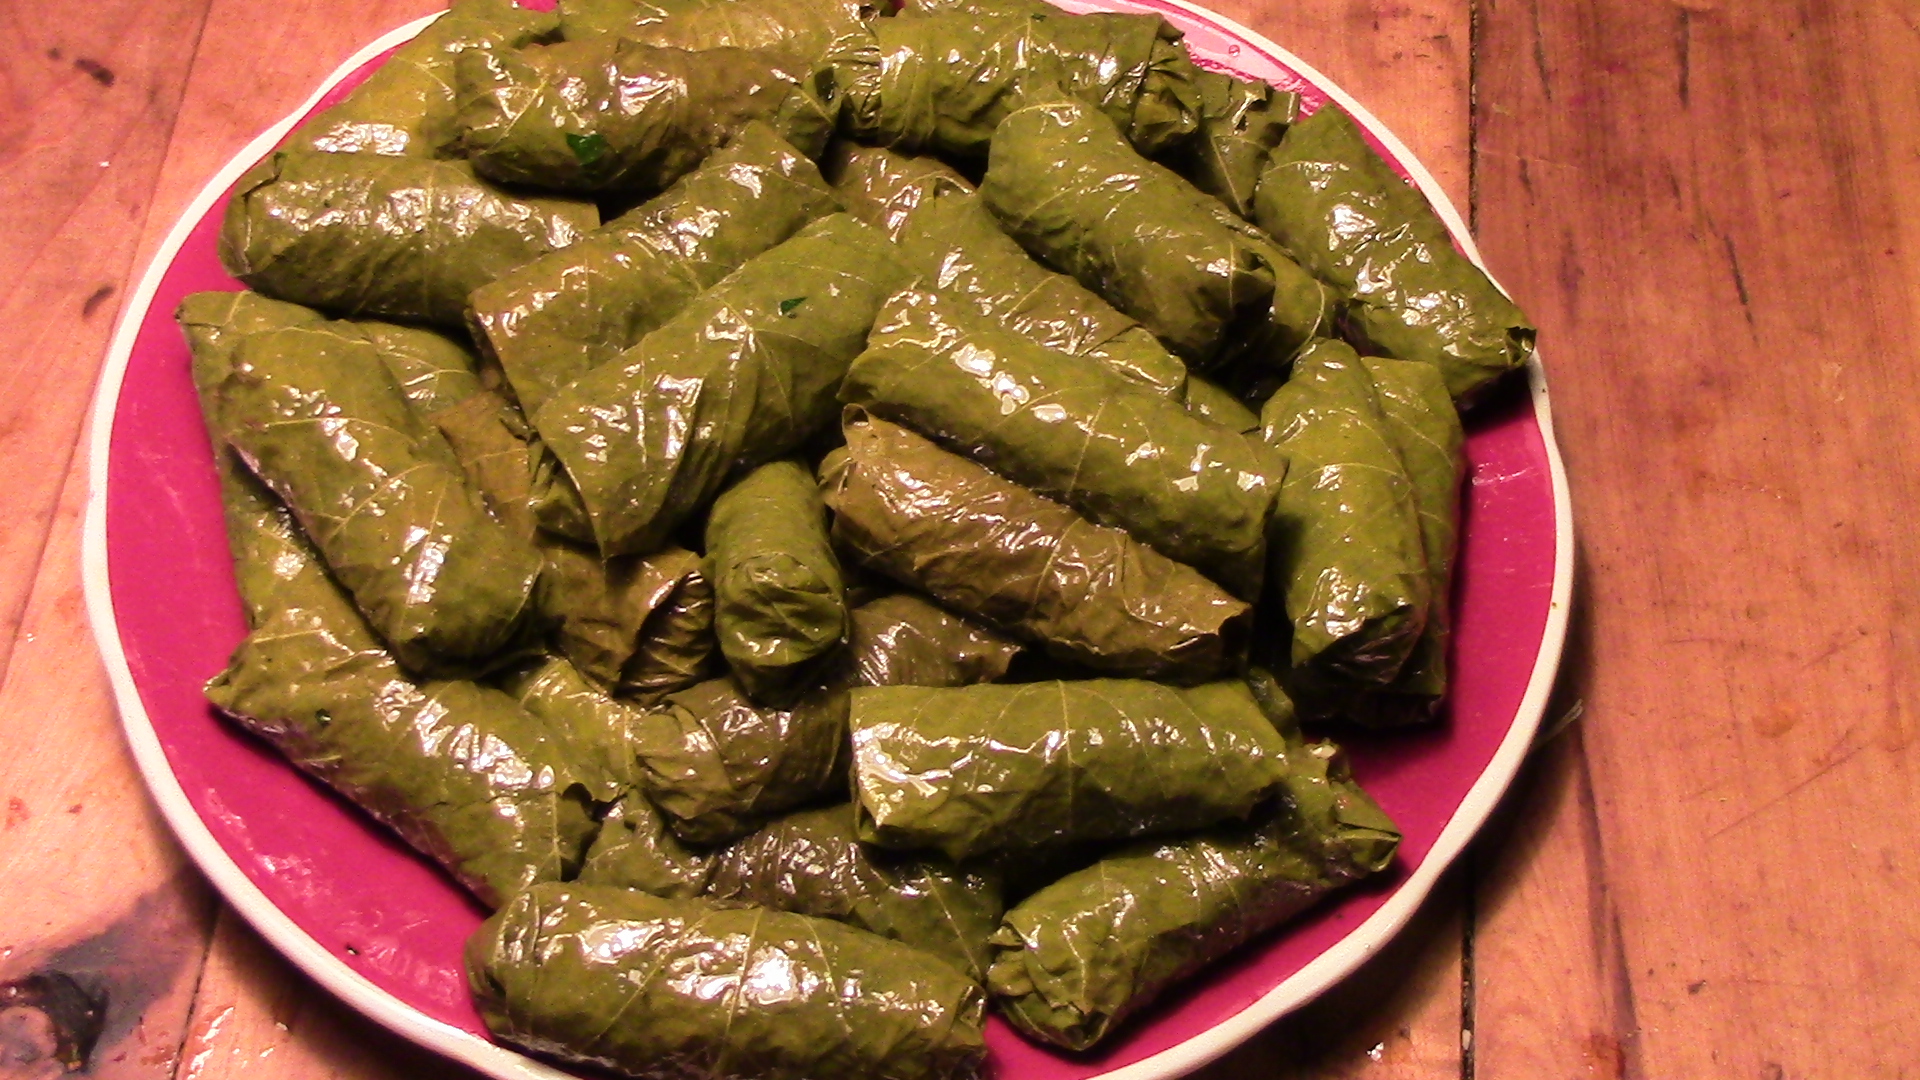
A plate full of stuffed grape leaves ready for the Valentine's day party. More will be served today at the neighborhood seed-sharing gathering.

American Persimmon & Whiskey Infused Morello Cherry Enrobed in Bittersweet Chocolate
A visual journey — playing with unusual fruit and chocolate to create tasty treats for the holidays.


American persimmons (Diospyros virginiana) — a native American winter fruit, picked today on Dec. 10th in the Mid-Hudson Valley of NY. Right now they taste like gooey carmel meets Barhi date in the house of apricot.

On the plate with the American persimmons are Morellos, a black sour cherry we picked in July. We put the cherries up in whiskey and maple syrup. The liquid is poured off and sipped as a cordial and the cherries are eaten straight or coated in chocolate.

Here is one of the jars we put up back in July. (The photo was taken today.) The cherries are steeping (also referred to as macerating) in the liquid and left at room temperature. No heating or canning used here, just time. When making this, the ratio of cherries, to sweetener, to liquor can vary depending on ones taste buds. However one rule needs to be followed: the concoction needs to contains at least 20% alcohol when finished, also referred to as 40 proof. This amount of alcohol preserves the mixture. You can have a higher alcohol content if you like, but not lower, or funky things can happen.

I use organic bittersweet chocolate dollops with a 67% cacoa content that I buy at my Natural Foods Coop in bulk. I gently warm the chocolate in a double boiler, just enough to melt it. Caution: don't over heat the chocolate; proceed slowly and gently.

Tim is holding the persimmon by its calyx and dipping it into the chocolate.

American persimmon enrobed in chocolate.
Once dipped, the fruit is cooled by placing it in the refrigerator, freezer or the chilly outdoors until the chocolate hardens.

The platter contains American persimmons and whiskey infused Morello cherries enrobed in bittersweet chocolate.
Time to go to the potluck with our platter of unusual fruits dressed in chocolate. Note: make sure to warn folks about the seeds!
Fruit Mousse Pie
Fruit Mousse Pies are wonderful to serve during the holiday season. Very refreshing and perky, they balance the richness of a typical Thanksgiving meal. The recipe I share with you below comes from my book Foraging & Feasting: A Field Guide and Wild Food Cookbook.

Berry picking in late July — blackberries and red & purple raspberries. Most of these berries were made into a Fruit Coulis and then frozen. From the Fruit Coulis I then make Fruit Mousse Pie, among other tasty things. The pie you see below was made this past Friday from red raspberries I picked in July.
Can you tell the difference between a blackberry and a black raspberry (see our images below)? Both are tasty and edible, so no toxic worries, yet it is still fun to know which plant you are harvesting/eating.
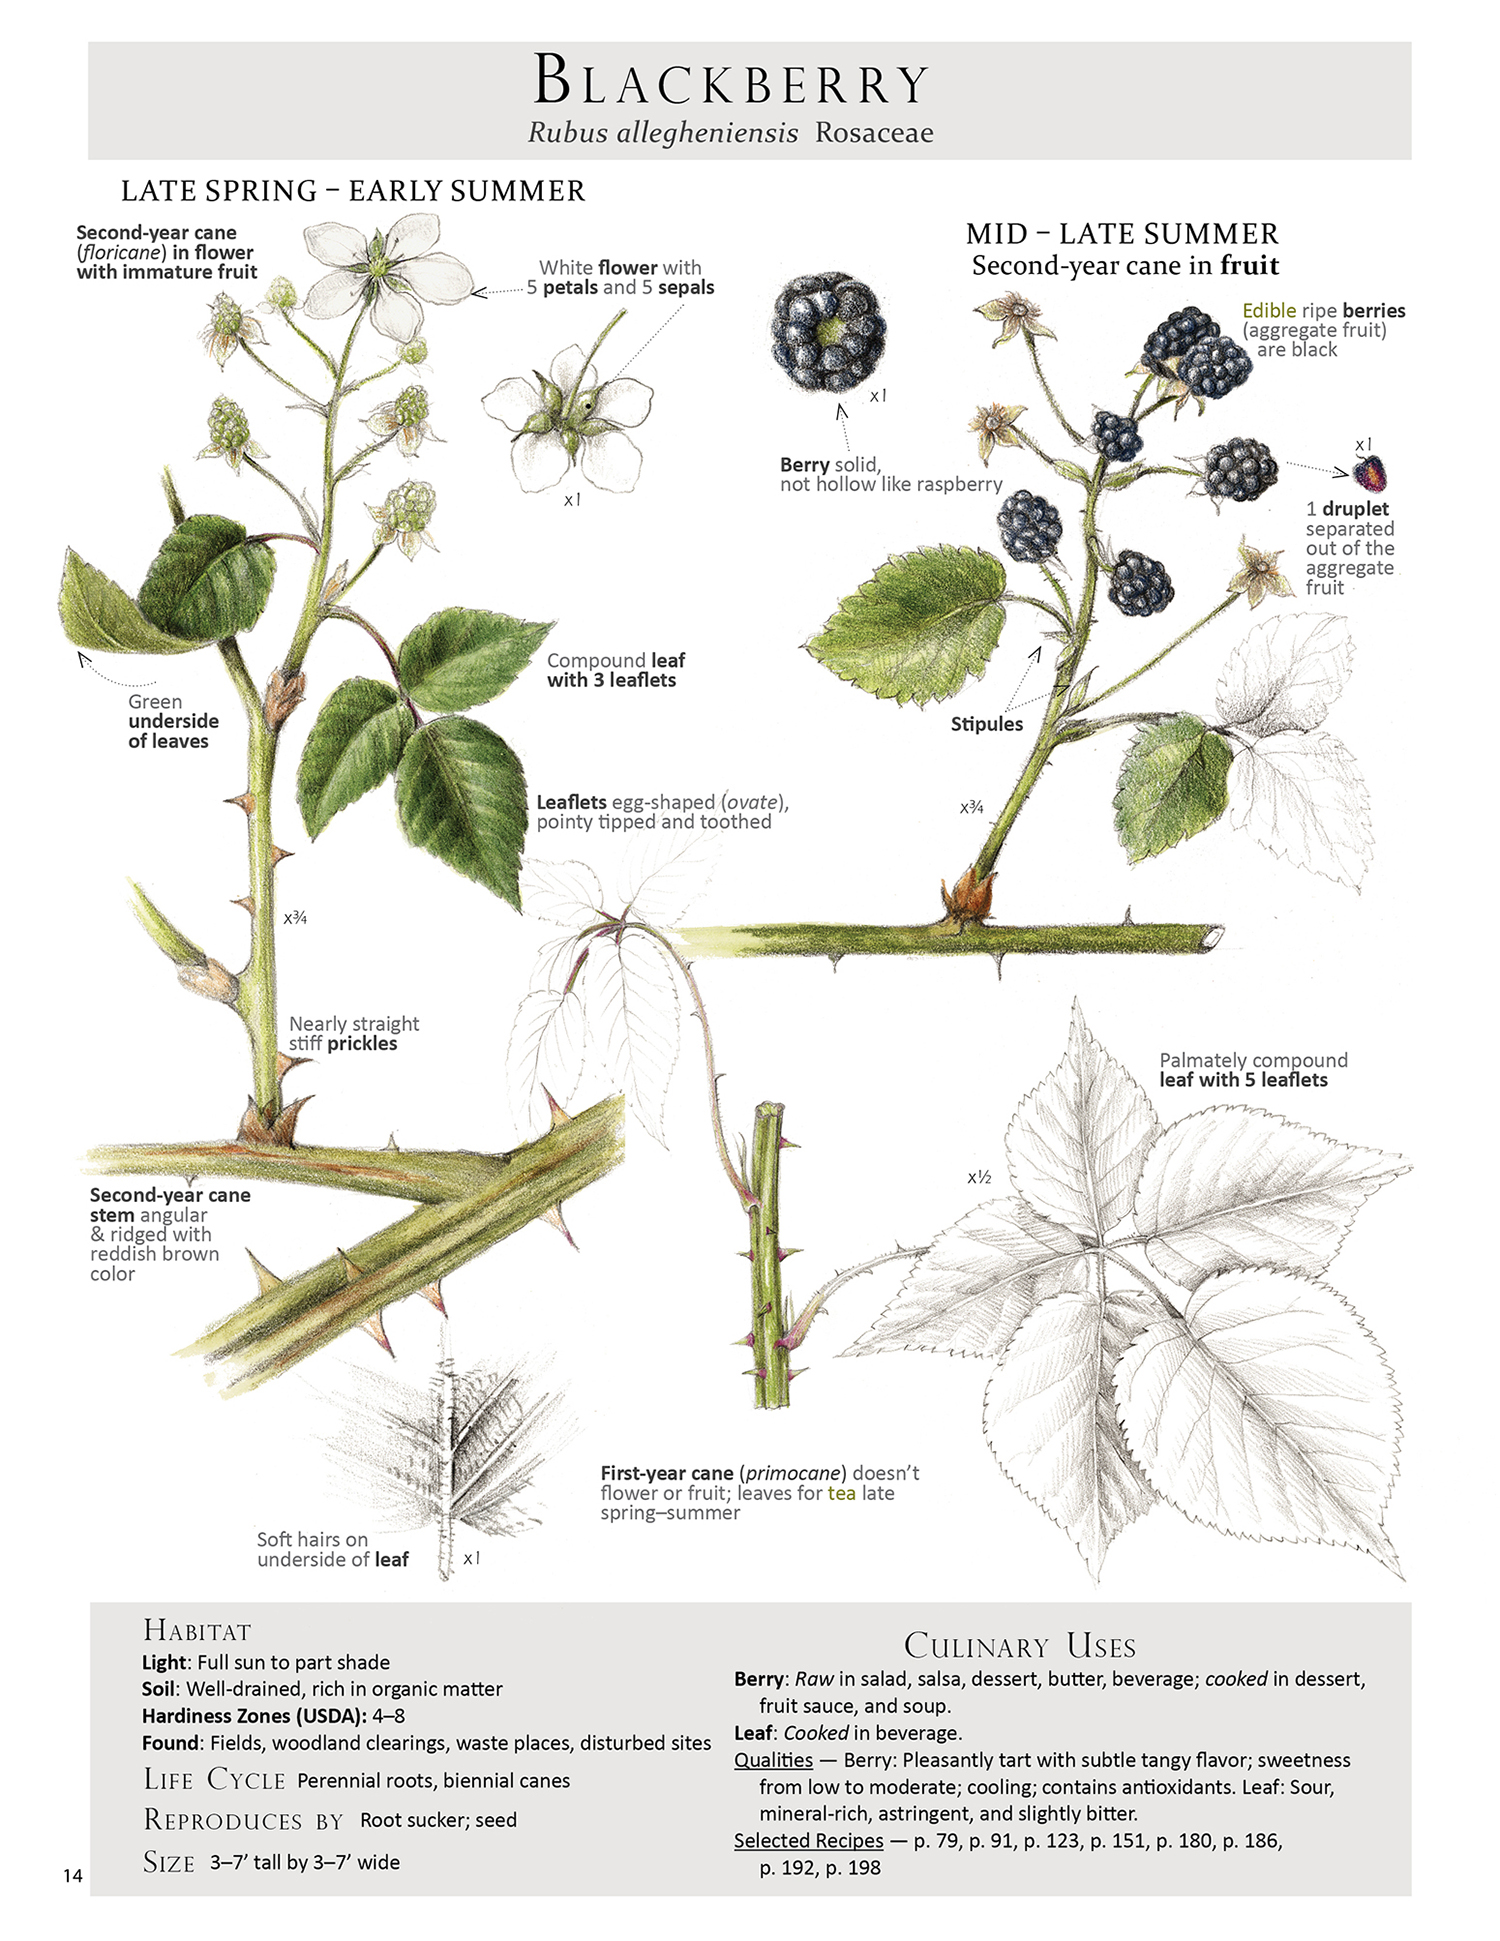
From the book Foraging & Feasting: A Field Guide and Wild Food Cookbook by Dina Falconi; illustrated by Wendy Hollender.

From the book Foraging & Feasting: A Field Guide and Wild Food Cookbook by Dina Falconi; illustrated by Wendy Hollender.
Here I am holding the Raspberry Mousse Pie after it has set in the refrigerator for a few hours. Now it's ready for slicing. This version has elderberries which I froze in September and sprinkled on top. The crust is a raw pressed crust made from hazelnuts and dried apricots.

Raspberry Mousse Pie with Elderberries sprinkled on top — recipe from the book Foraging & Feasting: A Field Guide and Wild Food Cookbook by Dina Falconi; illustrated by Wendy Hollender
Sweet offerings: Raspberry Mousse Pie sprinkled with elderberries, homemade maple-sweetened whipped cream (from organically fed, grazed cows), house-made bittersweet organic chocolate covered black sour Morello cherries (whiskey infused), and American persimmons just picked from our tree = the dessert menu from this past Friday's dinner.


From the book Foraging & Feasting: A Field Guide and Wild Food Cookbook by Dina Falconi; illustrated by Wendy Hollender.
Fall Bitters: Make your own for the holidays — Promotes Digestion & Liver Health
Bitters speak to these upcoming days of feasting. They help us digest our food, especially when eating large quantities of rich fare. Bitters also tone and support liver function which makes many things work well in our lives (the liver is responsible for over 500 metabolic functions). As a flavor enhancer, drops are often added to mixed drinks. When poured into an attractive glass bottle featuring a homemade label, these make great gifts. Why not create your own? I am excited to share my Therapeutic Spirits Master Recipe and Variations that will empower you to do so. Many of the weedy wild plants that are bitter and/ or aromatic can be used for making this therapeutic elixir. At this time of year the roots are particularly potent and great for making bitters. Think: roots of dandelion, yellow dock, burdock, and sweet cicely. Happy bitter-making!
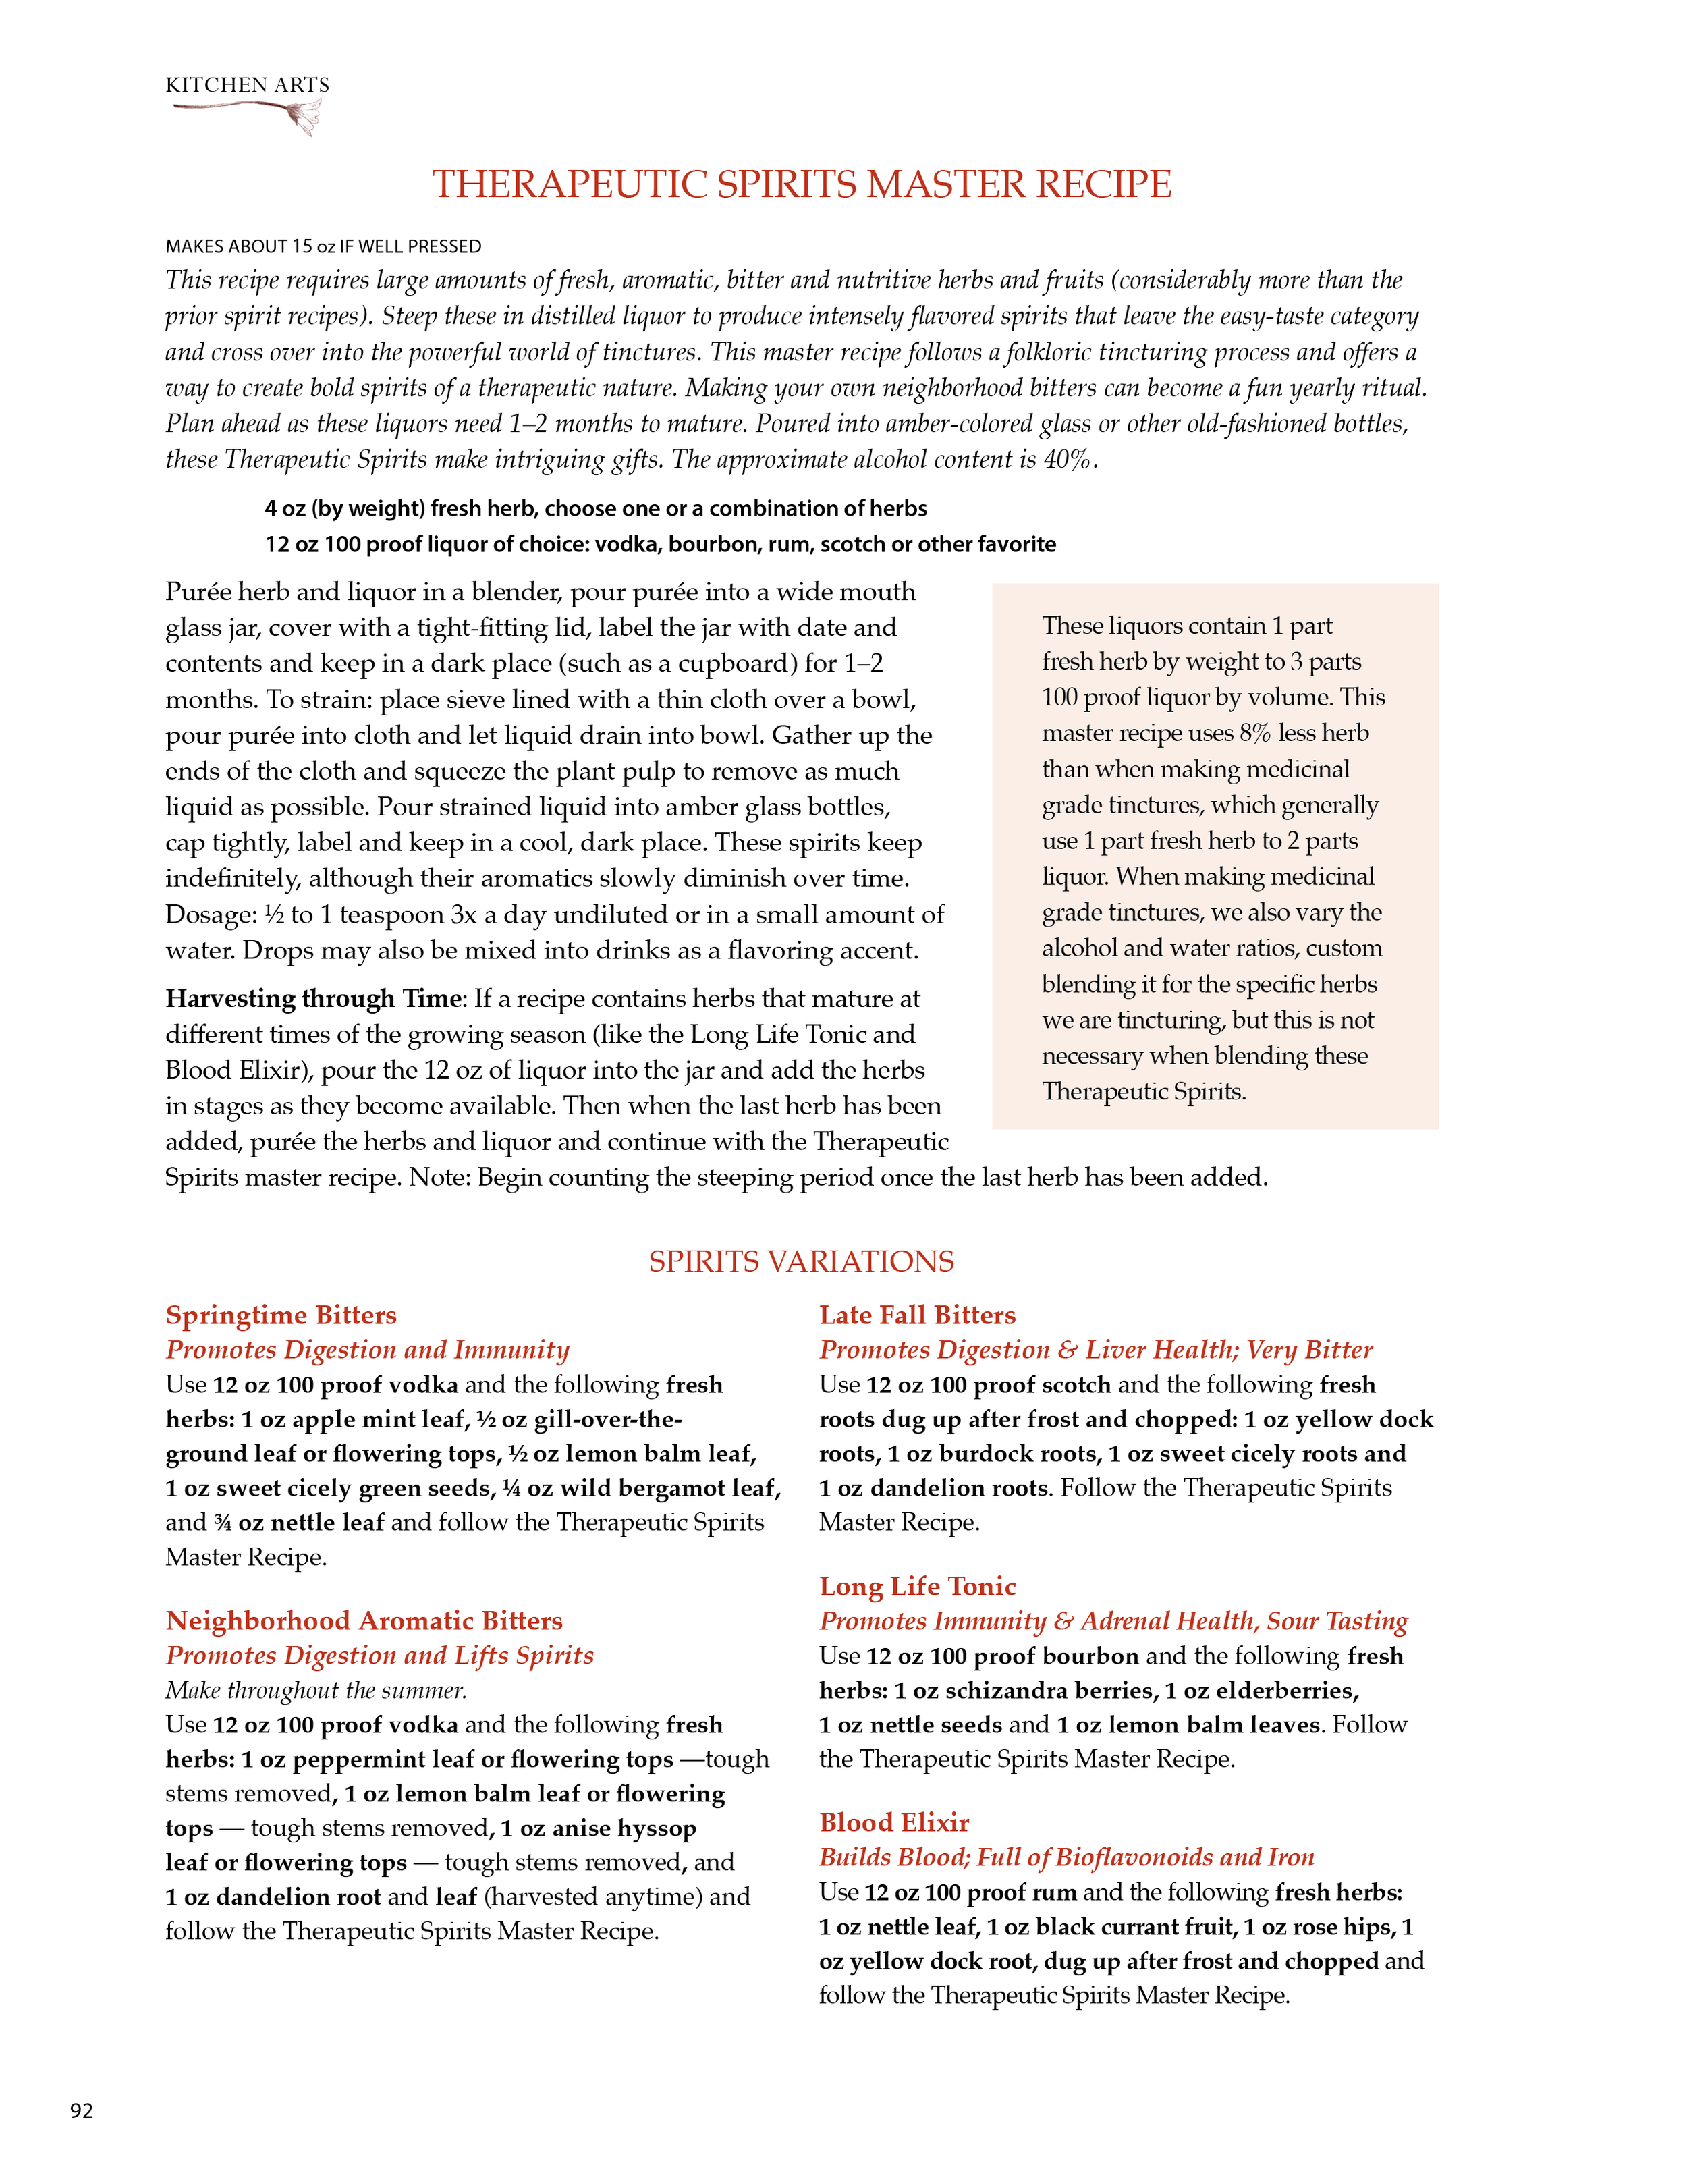
From the Beverage Chapter of Foraging & Feasting: A Field Guide and Wild Food Cookbook by Dina Falconi; illustrated by Wendy Hollender.

One of the Burdock pages from Foraging & Feasting: A Field Guide and Wild Food Cookbook by Dina Falconi; illustrated by Wendy Hollender.
The best time to dig burdock root is when it is in basal rosette stage, as illustrated above.

A student making bitters (aka digestive tonic) during summer herb class.
Field Garlic Returns
After resting during the hottest, driest months of the year, field garlic (aka Allium vineale) returns with full vigor. Closely related to chives and scallions, this perennial of the Amaryllidaceae family can be used similarly, offering a strong, pungent, spicy, aromatic onion flavor. Originally from Europe, it now grows prolifically in many parts of the world, especially here in the Northeastern US. Often referred to as onion grass: it looks like grass; flourishes in lawns; and tastes oniony. Also look for field garlic in fields, gardens, and open woods.
Why not include field garlic in your food for a little free, wild flavor! Mince it up and add it to salad, soup, frittata, scones, wild green pesto, baked fish and so much more. BTW, it's probably growing right outside your doorstep. For clues on how to identify it properly, please refer to the image here from my book Foraging & Feasting: A Field Guide and Wild Food Cookbook.

From the book Foraging & Feasting: A Field Guide and Wild Food Cookbook by Dina Falconi, illustrated by Wendy Hollender
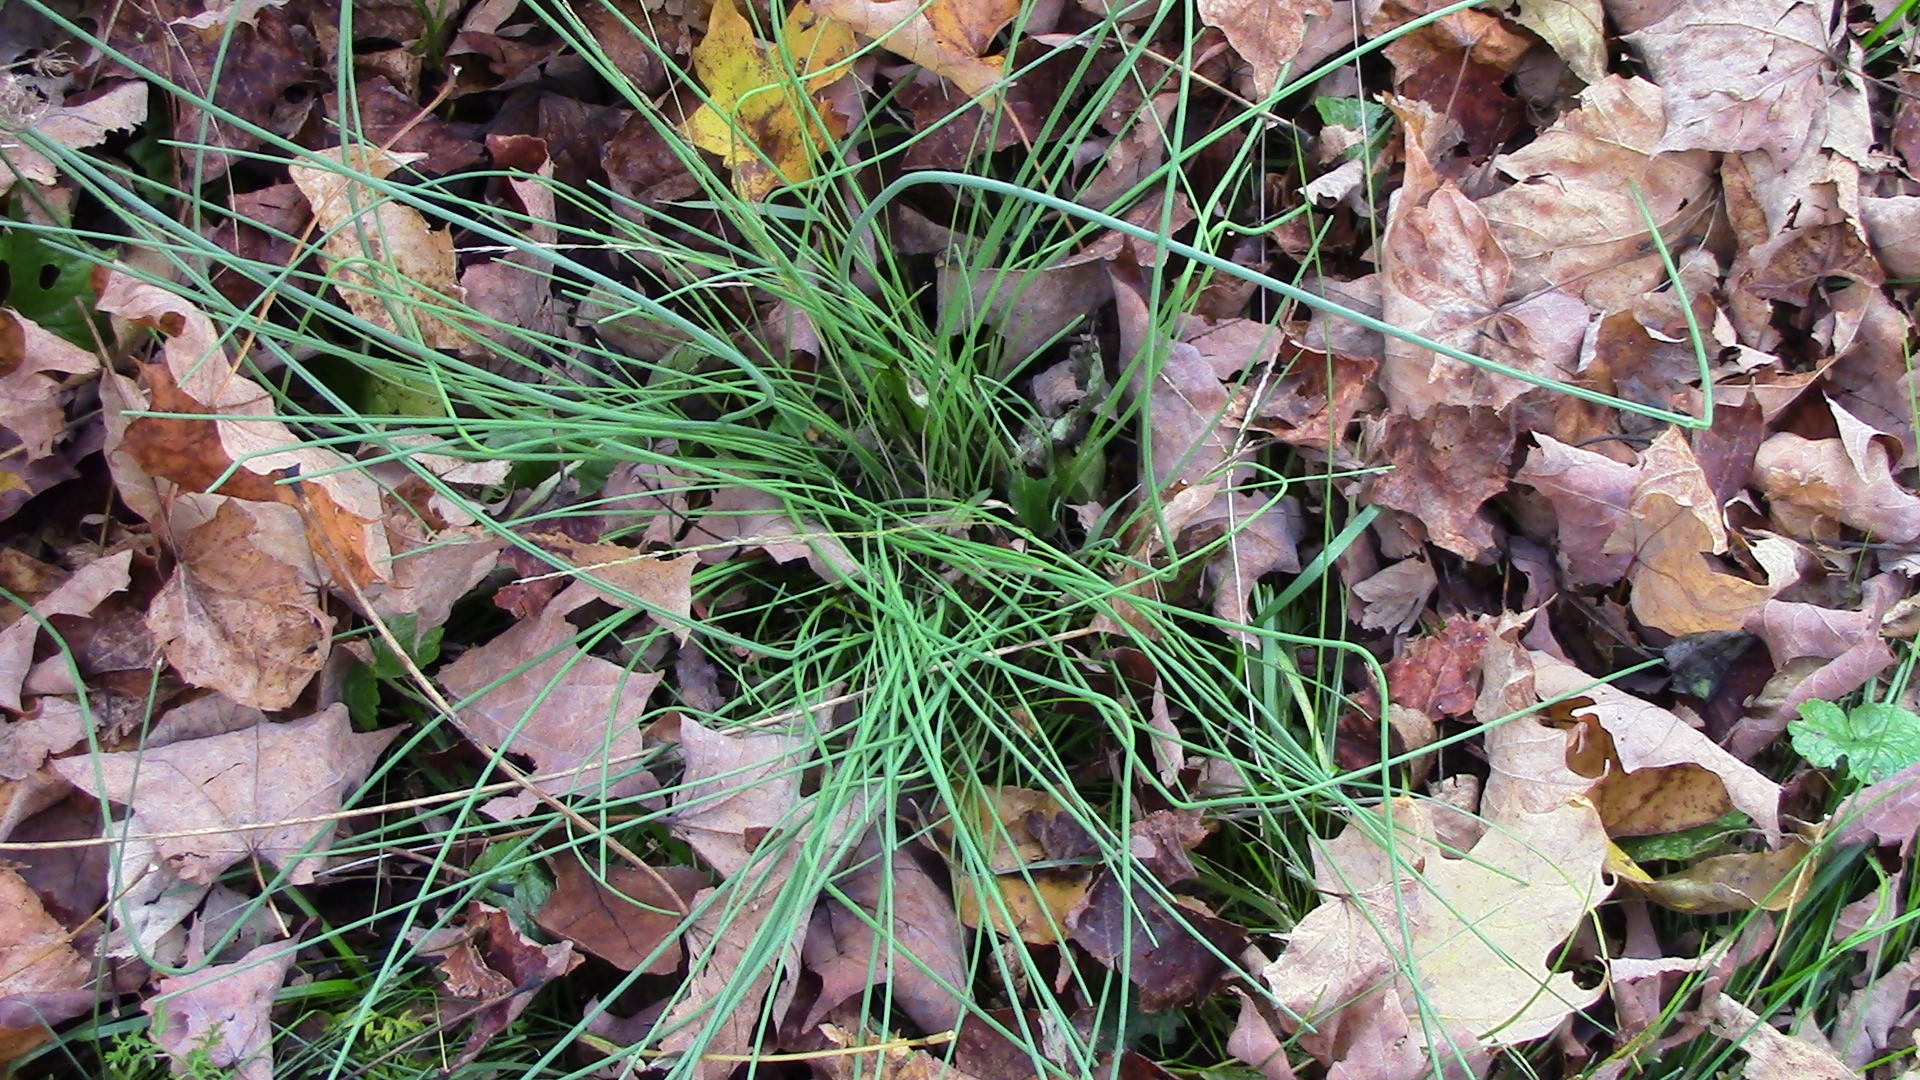
Field garlic photo taken today.
This photo of field garlic shows how much it looks like a clump of grass. Not so helpful in distinguishing it from other plant species. The strongest clue is it's aroma = onion! Again, please refer to the clues on our plant page above for help with accurate identification.
Dandelion: A Constant Companion
Wondering which wild edible to eat right now? = Dandelion. She seems to always be available, offering superior nourishment throughout the growing season. In this mid-fall moment, I like to gather her leaves and add them to salads, adding just enough; too much and the salad becomes too bitter. I also make sure to mince the leaves up, dispersing them well into the milder-tasting greens. This perennial of the Asteraceae, originally from Eurasia, is one of our most common weeds that boasts profound nutrient density: high in beta carotene, vitamin C, calcium and iron. The bitterness, while often not enjoyable to many palates, is quite healthful as a digestive aid and liver tonic. Remember when we support our digestion and our liver — many, many, good things happen.
To help with identification, harvest and use please, look below at the Dandelion Plant Map from my book Foraging & Feasting: A Field Guide and Wild Food Cookbook by Dina Falconi; illustrated by Wendy Hollender.
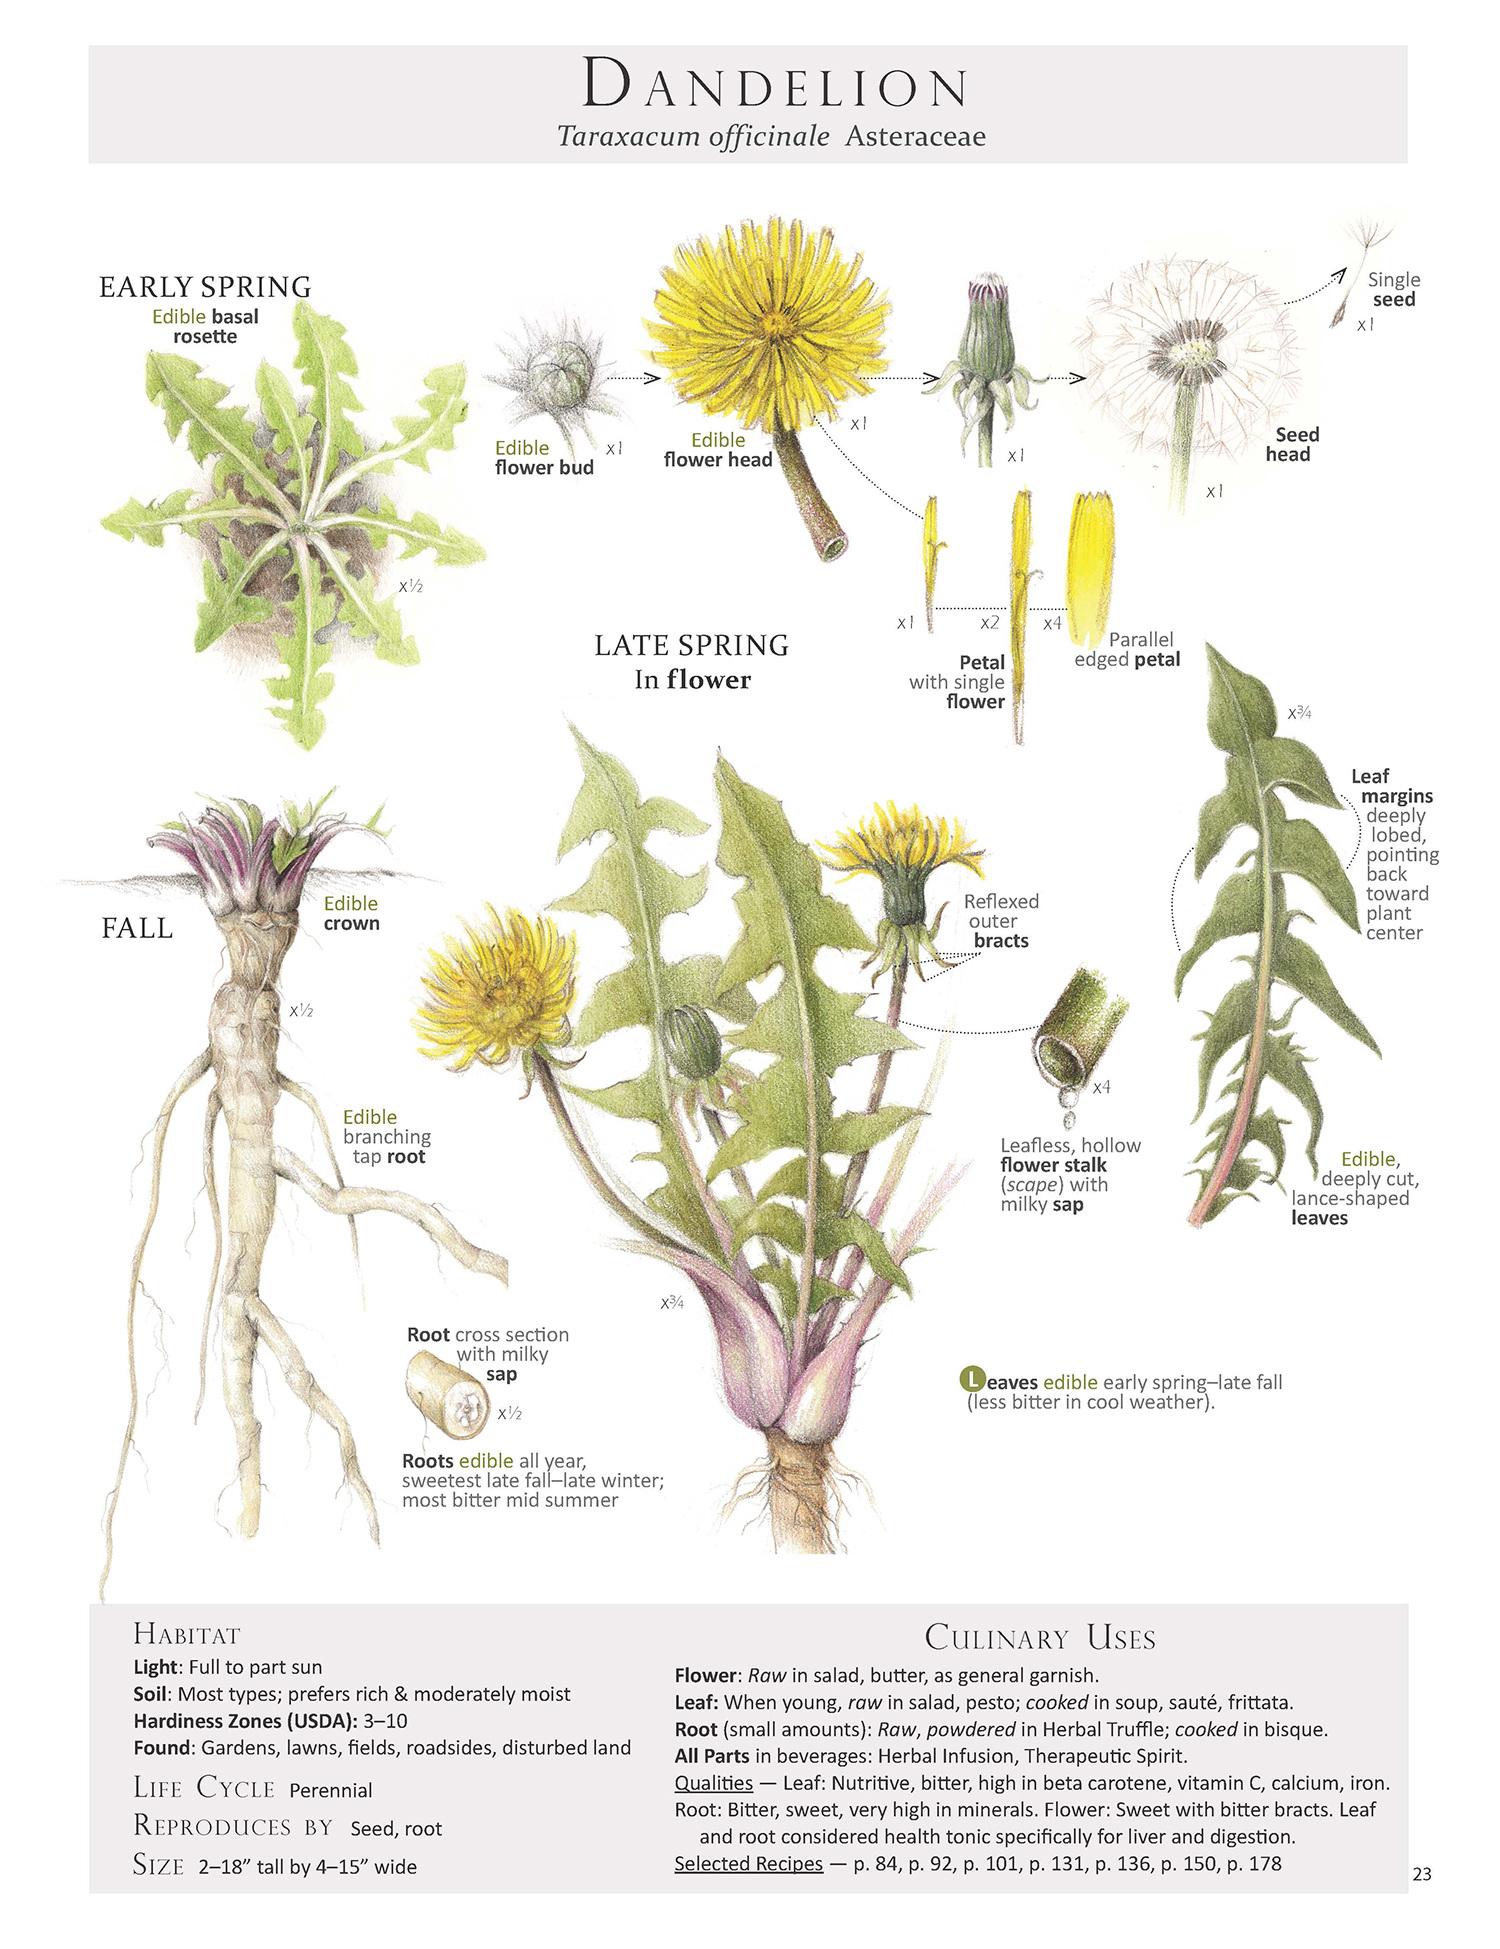
From the book Foraging & Feasting: A Field Guide and wild Food Cookbook by Dina Falconi; illustrated by Wendy Hollender.
Wildness Captured & Preserved in Sea Salt: Old School Bouillon
Wondering what to do with all those aromatic culinary herbs — wild or cultivated? Here's an ancient salting technique — a simple way to capture and preserve wild plants as they pass through the landscape. By mixing strongly flavored plants with each other, and also with milder ones, we can create intriguing taste combinations. Add a tablespoon or two of this savory condiment — think of it as a bouillon substitute — to flavor sauces, stews, soups, beans, and more. This recipe is an excerpt from the Relishes, Spreads, and Condiments chapter from my book Foraging & Feasting.

From the book Foraging & Feasting by Dina Falconi; illustrated by Wendy Hollender.
Chickweed: A Weedy Super Food
Hooray, CHICKWEED (Stellaria media), a weedy super food — free, abundant, and available — is back in full swing. This lovely little friend is so nutritious: high in Vit. C, beta carotene, iron, calcium, etc. She is mild and tasty. Perfect for salad, in wild green pesto, lightly steamed, or added to soup during the last few minutes of cooking. She likes moist rich soil and will grown in full sun to part shade. Look for her in gardens, lawns, meadows, woodland edges, and waste places. The image of chickweed below is a "plant map" from our book from my book Foraging & Feasting: A Field Guide and Wild Food Cookbook by Dina Falconi; illustrated by Wendy Hollender. Hopefully it will help you to identify chickweed accurately throughout the growing season. Good luck!

From the book Foraging & Feasting: A Field Guide and Wild Food Cookbook by Dina Falconi; illustrated by Wendy Hollender.
Fruit Coulis
Fruit coulis pack serious flavor and nutrients. This is my favorite way to process berries and small fruits as they whirl through the landscape. The Fruit Coulis Master Recipe below is from my book Foraging & Feasting: A Field Guide and Wild Food Cookbook by Dina Falconi; illustrated by Wendy Hollender. May it bring tasty nourishment into your life.

Sheep Sorrel: Lovely sourness returns in full swing
In these early fall days, I like to gather the vibrant shimmering leaves of sheep sorrel. The rain and cooler weather makes them large and plump; perfect for adding to salad. This sour, slightly sweet, and refreshing plant is the diminutive relative of garden sorrel or French sorrel. All of them belong to the Rumex genus of the Polygonaceae family. Sheep sorrel (Rumex acetosella), a weedy perennial found in many parts of the world, boasts a good amount of vitamin C with refrigerant (cooling) and astringent qualities. Look for it in fields, gardens, lawns, disturbed ground, forest edges..... it's common and prolific. Use in: wild green pesto, dip, wild green goddess dressing, soup (think shav or shtshav), beverage; topping for fish or meat loaf. For more information and to help identify the plant, see the plant map below from Foraging & Feasting: A Field Guide and Wild Food Cookbook by Dina Falconi; illustrated by Wendy Hollender.
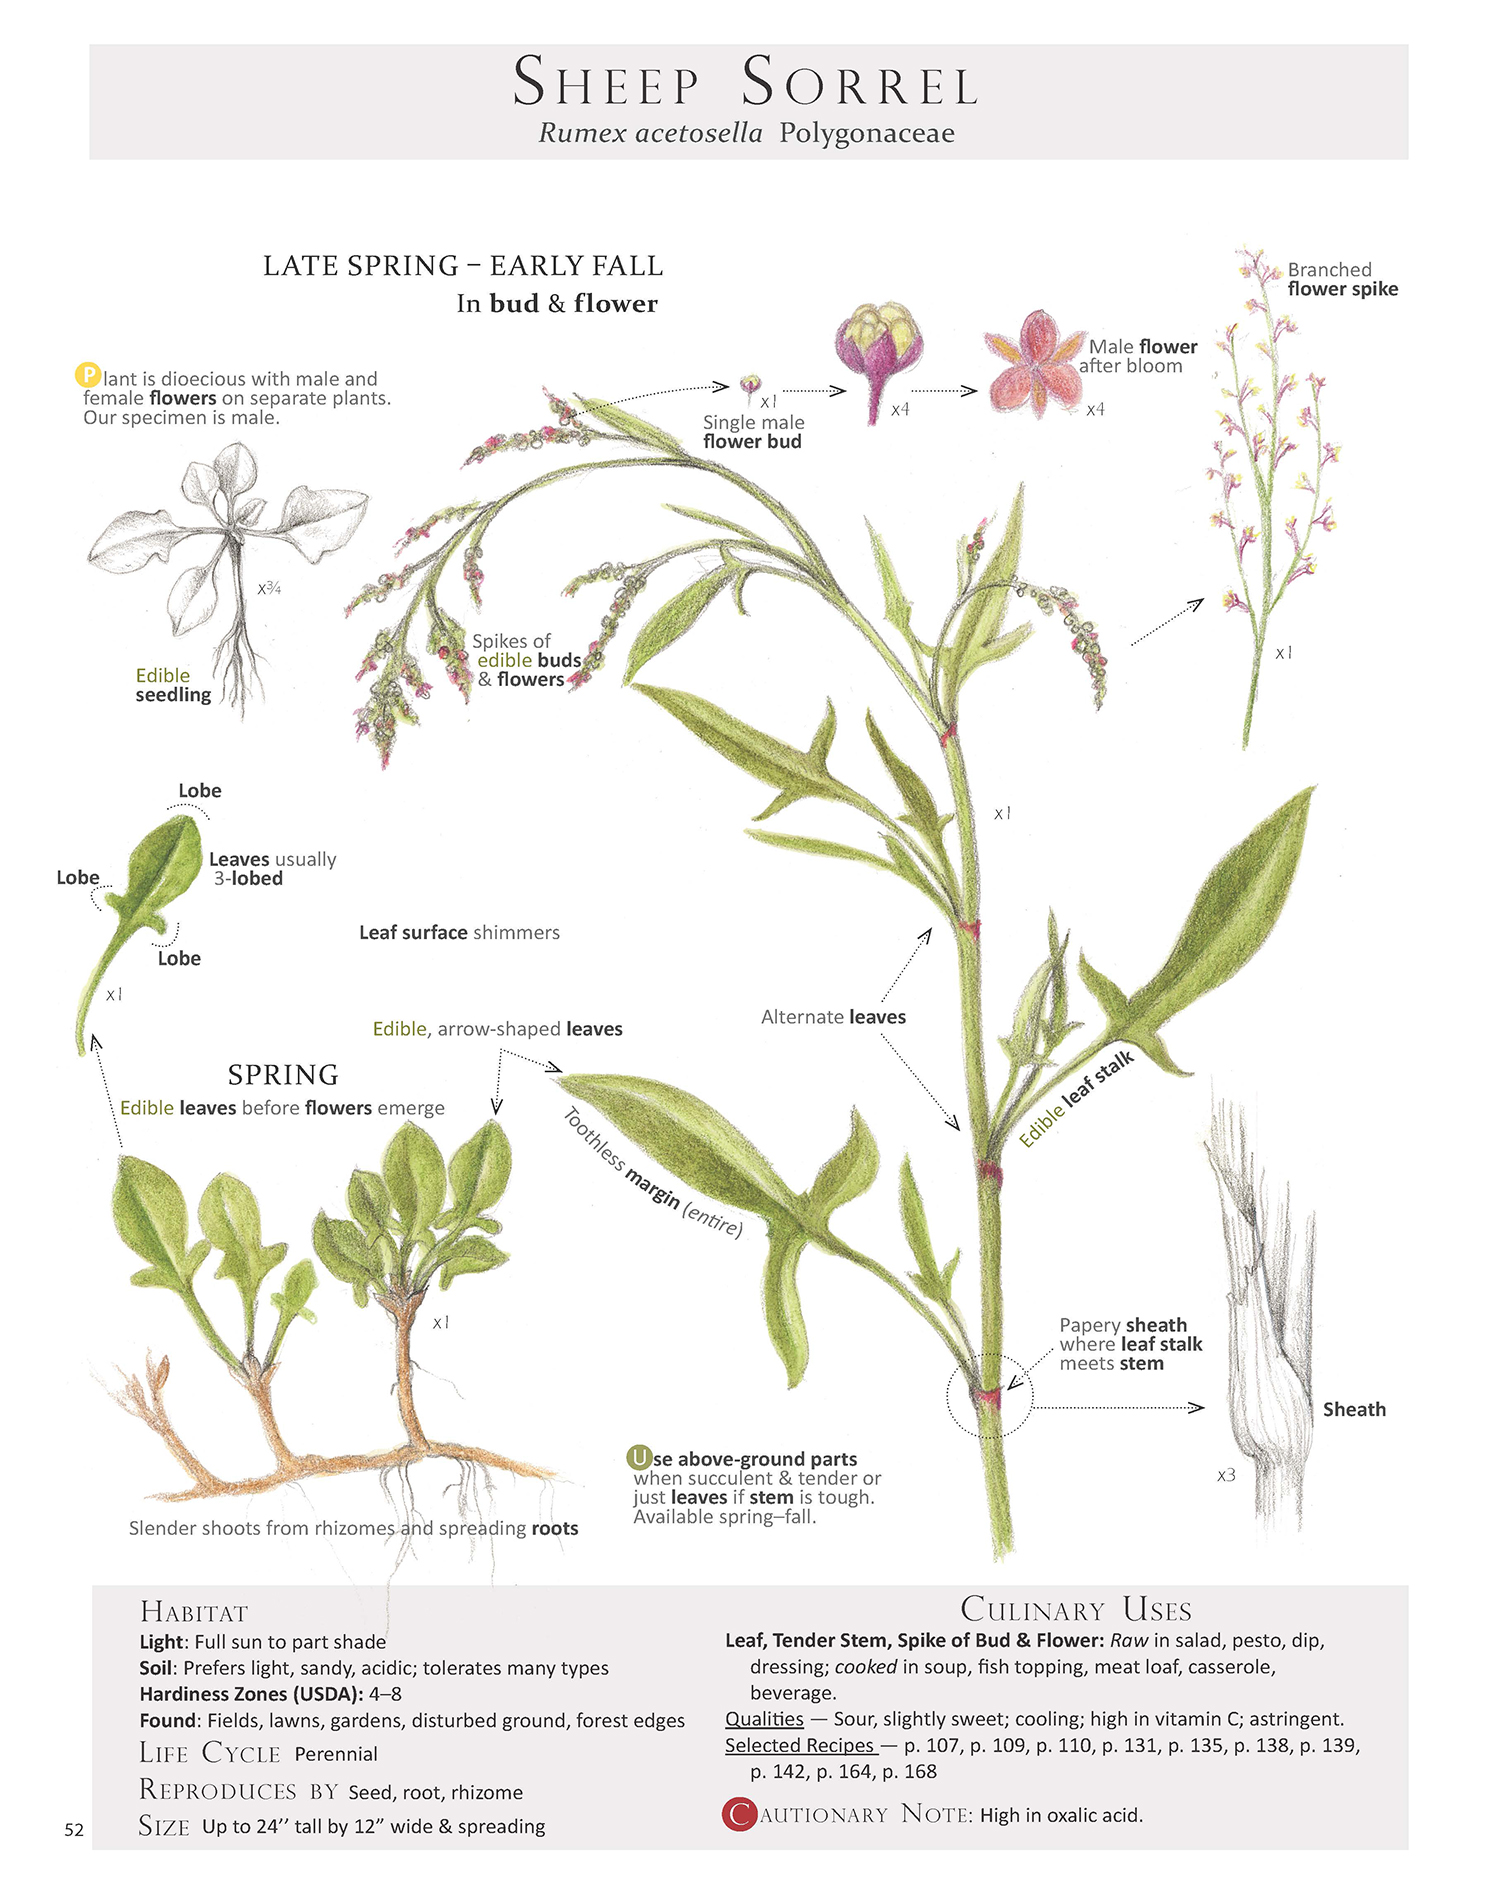
From Foraging & Feasting: A Field Guide and Wild Food Cookbook by Dina Falconi; illustrated by Wendy Hollender.
Hazelnut Chocolate Cookies flavored w/ aniseed: flour-less; dairy free option
The making of a seriously decadent and tasty treat, featuring hazelnuts, or other wild nut of choice, and organic chocolate. Aniseeds lend a delicate flavor to the deep rich, fudge-like cookie — wild fennel seeds or green sweet cicely seeds can be used instead. This flour-less recipe can be made with delicious, luscious coconut oil rather than butter, if desired.
Thank you to The Village Tea Room for the recipe inspiration.

The cookie ingredients.
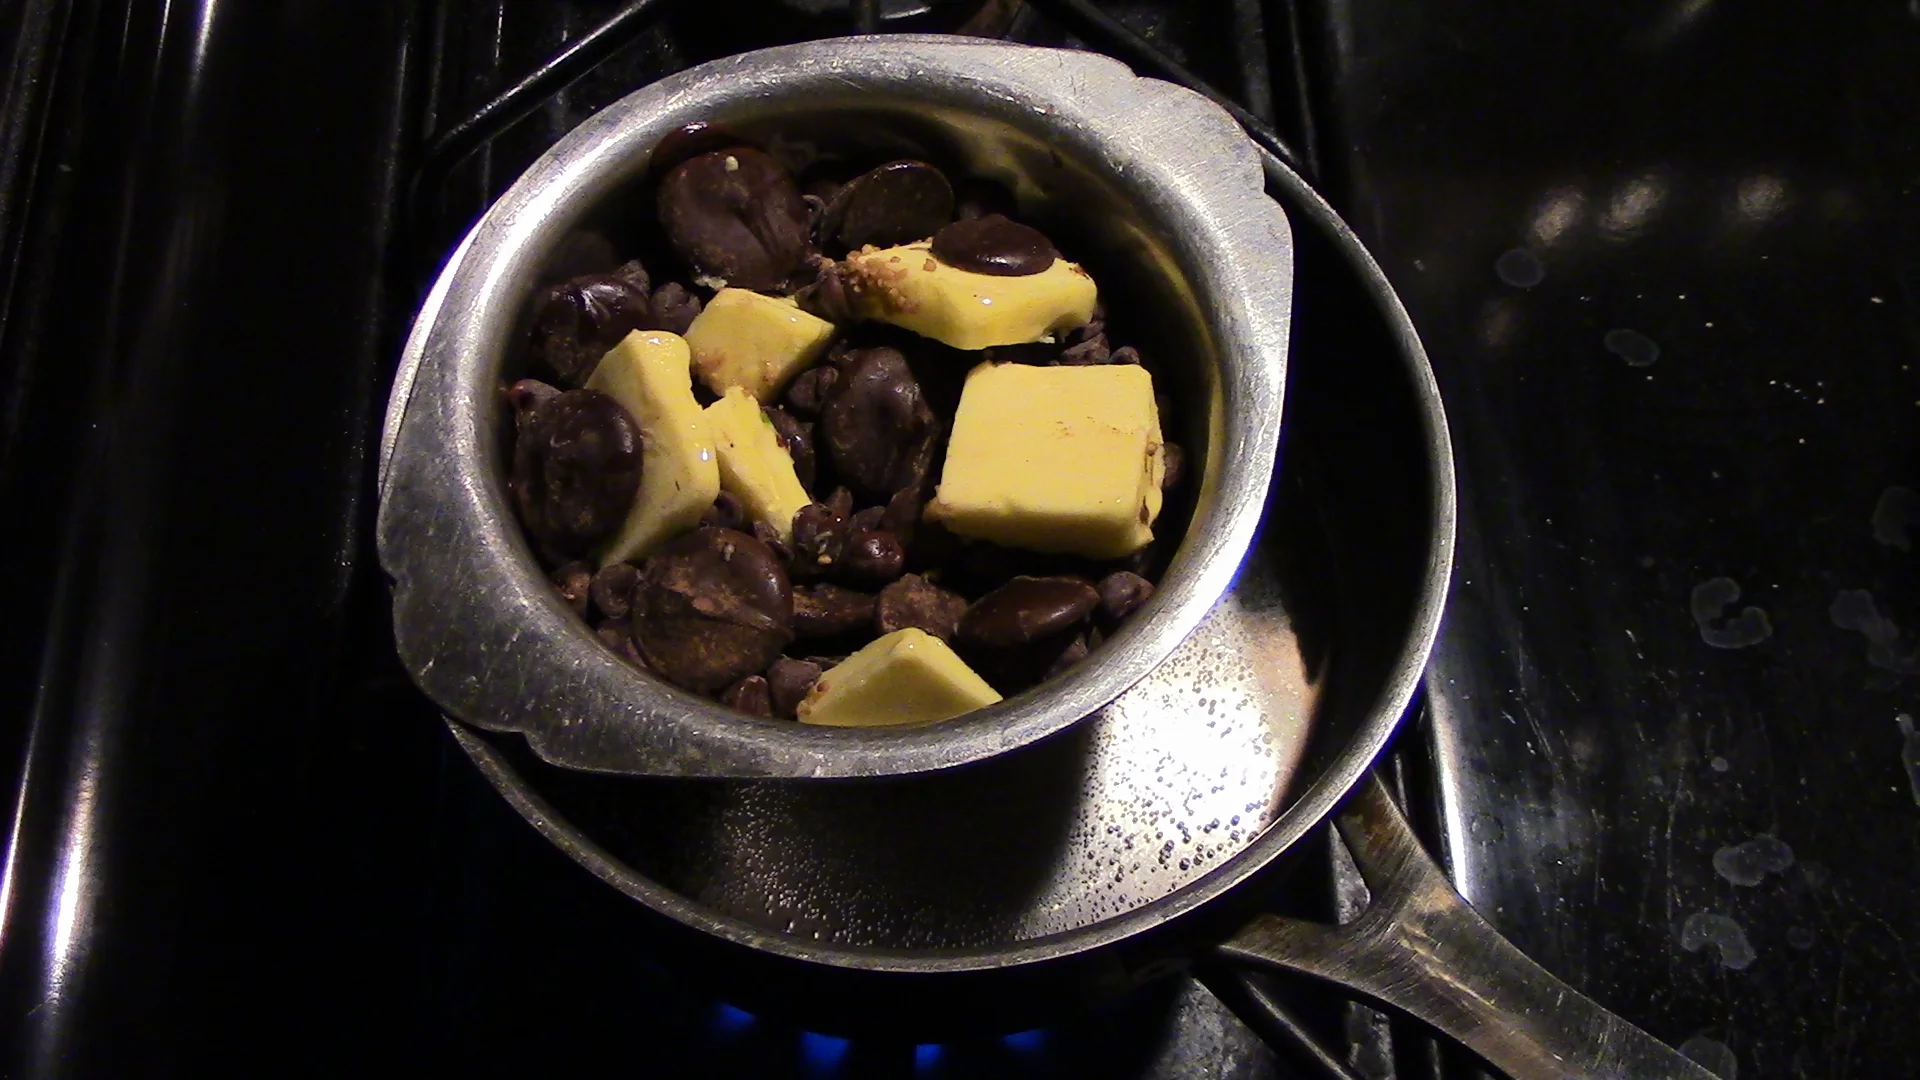
Gently melting the butter and chocolate in a hot water bath — home-rigged double boiler (aka baine marie). Gentle means the heat of the water isn't touching the vessel that the butter and chocolate are in. Also keep water out of the vessel or textural issues ensue.

The cookie dough, well mixed and ready for scooping onto the baking sheet.
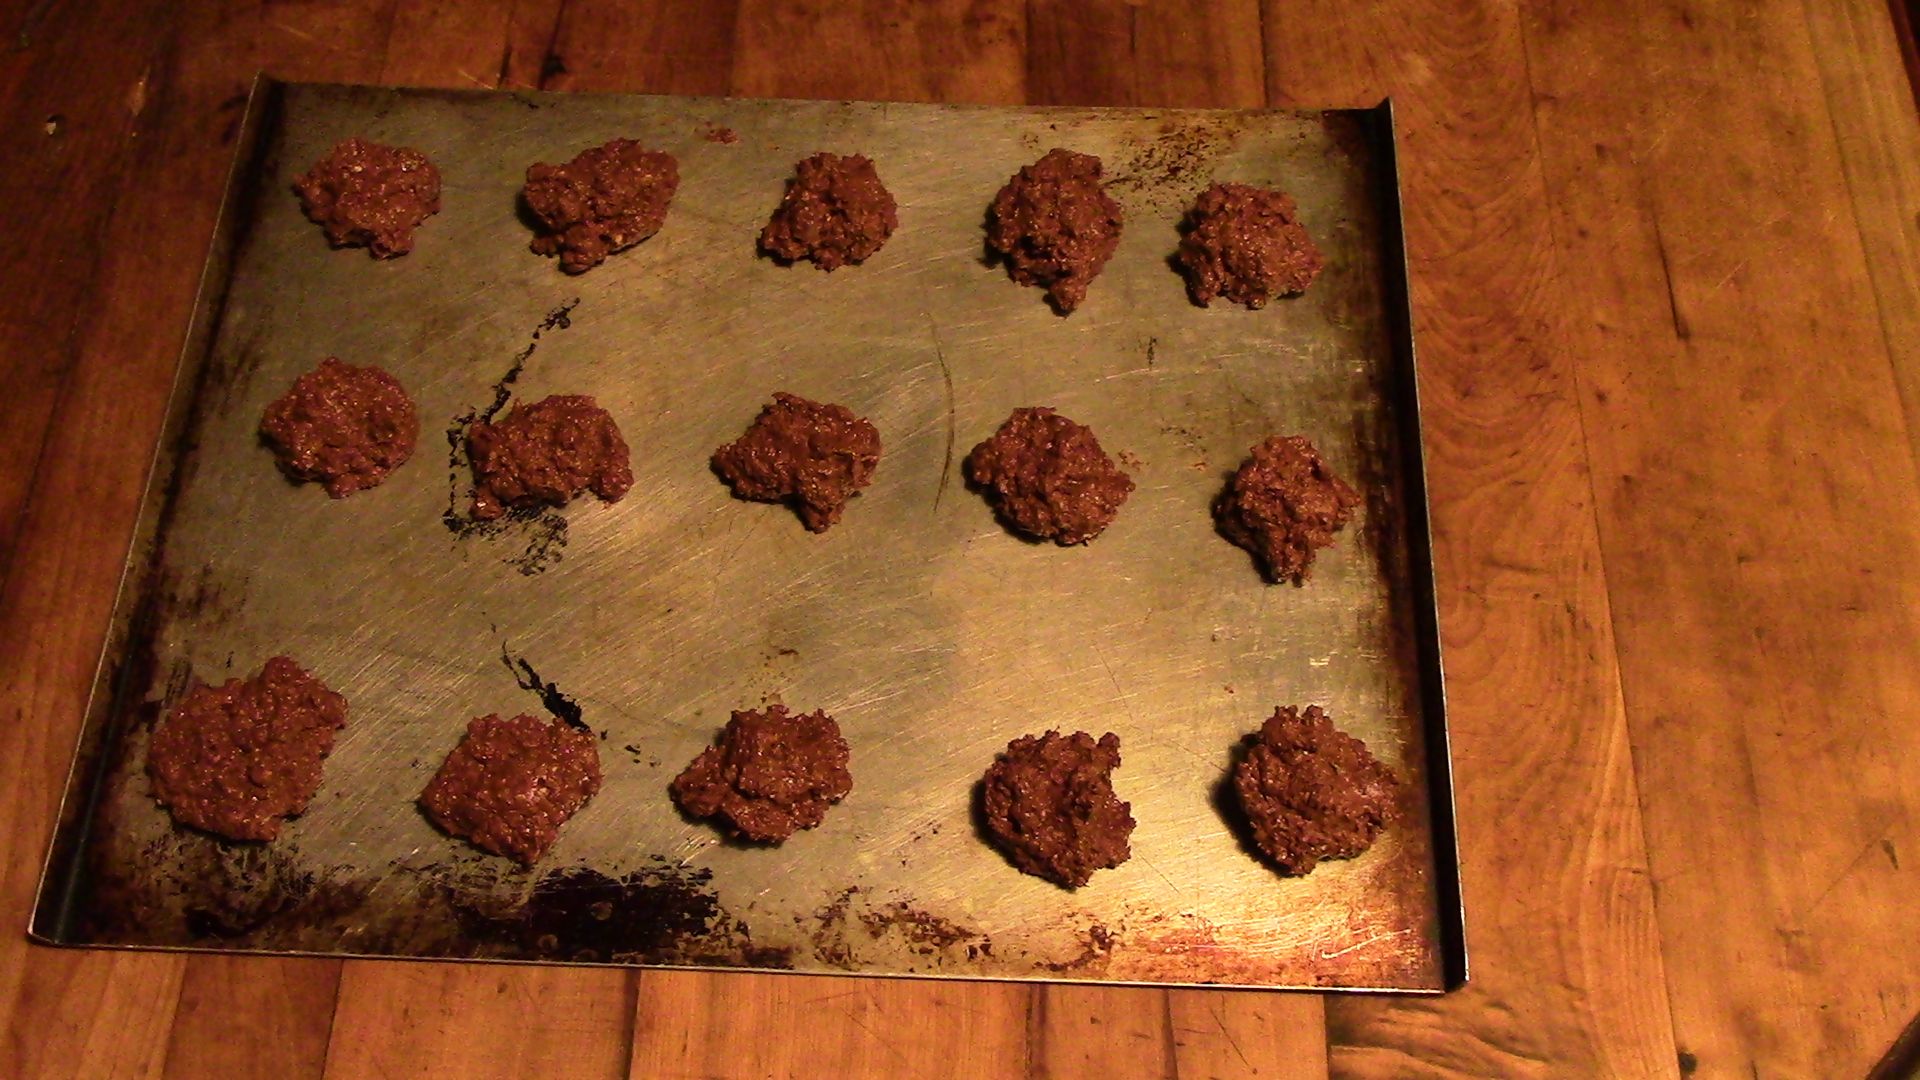
Cookie dough scooped from a tablespoon onto the cookie sheet.
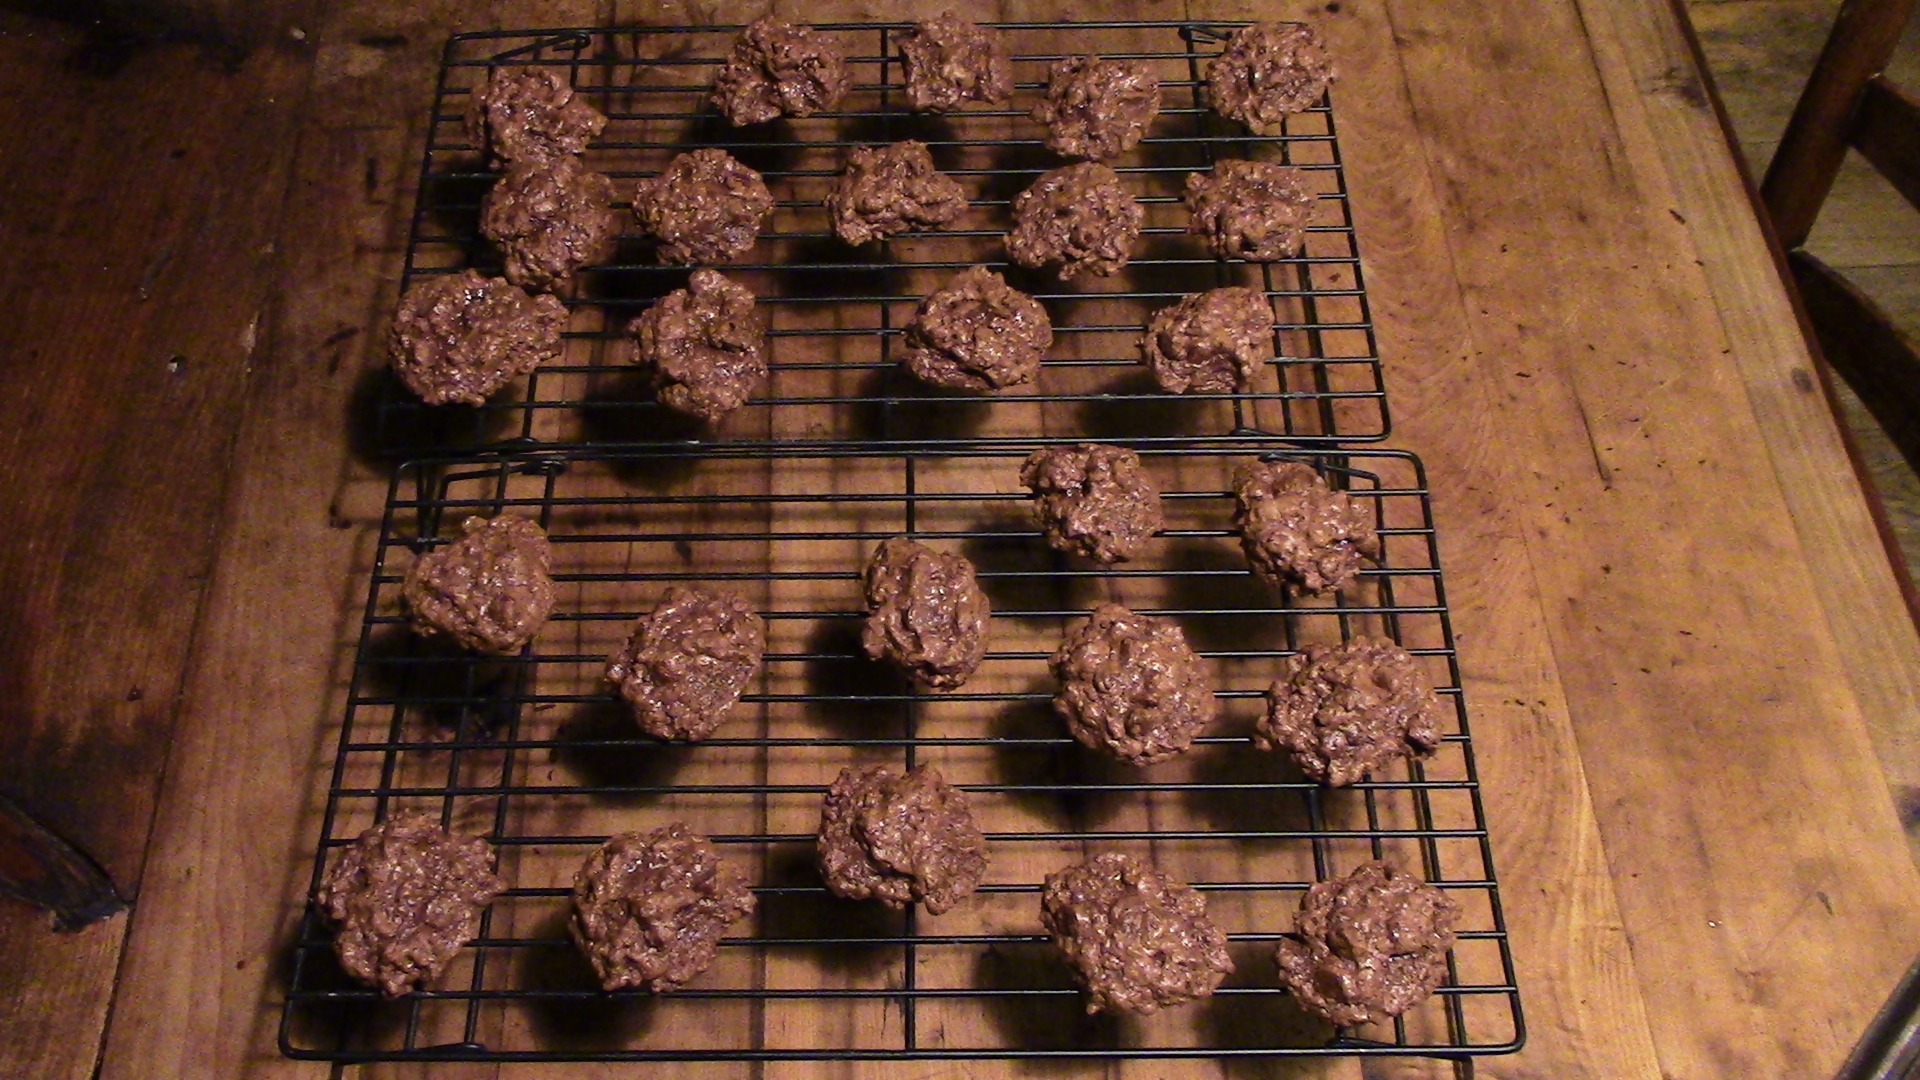
After baking, cookies are removed from the baking sheet with a spatula and left to cool on racks.

The result: a pile of cookies that will disappear faster than lightening!
Recipe:
- 2 oz (4 tablespoons) grass-fed butter or virgin coconut oil
- 3/4 cup Sucanat or granular maple sugar
- 2 free range fertile eggs
- 1 teaspoon homemade vanilla extract
- 8 oz bittersweet organic chocolate* chunks, dollops, or chips (to be melted)
- 2 tablespoons organic cocoa powder
- 1/4 teaspoon sea salt, finely ground
- 7 oz bittersweet organic chocolate* chunks, dollops, or chips, chopped (not melted)
- 2 cups chopped* hazelnut (preferably soaked and dried) or other nut of choice — I have used coconut, walnuts, cashew, green pumpkin seeds, almonds, singly or combined. FYI, coconut is does not need soaking and drying.
- 2 tablespoons aniseed (or sweet cicely seed), freshly ground
*Chocolate note: I suggest using 65-70% chocolate so it's more chocolate and less sweet. On a more extreme taste note, for those of us, like myself, who are eating very low sweet / starch, I have been known to use an organic 100% chocolate chip that produces a more intense, somewhat bitter cookie (this extreme not recommended for the average palate).
*The nuts need to be chopped / crushed into moderate size particles, so not finely ground, but not too coarsely chopped either. If making with coconut, use the shredded unsweetened dried version, not the larger flakes. If still not clear, let me know.
- Gently melt the 8 oz bittersweet chocolate chunks and butter in a hot water bath. Stir well and cool the mixture to room temperature.
- Meanwhile beat eggs, Sucanat and vanilla in large bowl with a mixer until well incorporated and fluffy, about 2 minutes.
- Add the chocolate-butter mixture to egg mixture and beat until well combined.
- In medium sized-bowl, mix the remaining dry ingredients: cocoa powder, sea salt, 7 oz chopped chocolate chunks, chopped nuts, and aniseed. Add to the egg/chocolate mixture and mix well.
- Scoop cookie dough with a tablespoon onto an un-greased cookie sheet.
- Bake at 350 for 9 minutes.
- Remove cookies from baking sheet with a spatula and cool on wire racks.
- Once fully cooled, store in tightly lidded containers in a cool place.
Makes 26 cookies
Nuts and Seeds: Soaking and Drying

From Foraging & Feasting: A Field Guide and Wild Food Cookbook by Dina Falconi; illustrated by Wendy Hollender
Sweet Cicely (Myrrhis odorata) of the Apiacae Family
The aromatic sweet seeds of Myrrhis odorata can be used in place of aniseed or fennel seed for flavoring beverages and dishes. Note the seeds are most flavorful when fully formed but still green; see image below. Now in early fall, the seeds of sweet cicely are dark brown and lack flavor. At this point the seeds are good for planting — sweet cicely seeds need to be planted soon after the plant produces them as older seeds won't germinate.
